zetcd isn’t compatible with 3.5 opcodes, so the latest CuratorFramework won’t work.
In particular, create2 is not supported (see other opcodes)
16:30 $ amm
Loading...
Welcome to the AmmoniteRepl1.0.5
(Scala2.12.4Java1.8.0_152)
If you like Ammonite, please support our development at www.patreon.com/lihaoyi
@import$ivy.{`org.apache.curator:curator-framework:4.2.0`}
import$ivy.$@importorg.apache.curator.framework.CuratorFrameworkFactoryimportorg.apache.curator.framework.CuratorFrameworkFactory@importorg.apache.curator.retry._importorg.apache.curator.retry._@CuratorFrameworkFactory.builder().connectString("localhost:2181").retryPolicy(newRetryOneTime(0)).build()
SLF4J:Failed to load class"org.slf4j.impl.StaticLoggerBinder".
SLF4J:Defaulting to no-operation (NOP) logger implementation
SLF4J:See http://www.slf4j.org/codes.html#StaticLoggerBinderfor further details.
res3: org.apache.curator.framework.CuratorFramework= org.apache.curator.framework.imps.CuratorFrameworkImpl@3dc39412
@ res3.start
SLF4J:Failed to load class"org.slf4j.impl.StaticMDCBinder".
SLF4J:Defaulting to no-operation MDCAdapter implementation.
SLF4J:See http://www.slf4j.org/codes.html#no_static_mdc_binder for further details.
r
@ res3.blockUntilConnected
@ res3.create().orSetData().forPath("/test", Array())
org.apache.zookeeper.KeeperException$ConnectionLossException:KeeperErrorCode=ConnectionLossfor/test
org.apache.zookeeper.KeeperException.create(KeeperException.java:102)
org.apache.zookeeper.KeeperException.create(KeeperException.java:54)
org.apache.zookeeper.ZooKeeper.create(ZooKeeper.java:1549)
org.apache.curator.framework.imps.CreateBuilderImpl$17.call(CreateBuilderImpl.java:1180)
org.apache.curator.framework.imps.CreateBuilderImpl$17.call(CreateBuilderImpl.java:1156)
org.apache.curator.connection.StandardConnectionHandlingPolicy.callWithRetry(StandardConnectionHandlingPolicy.java:64)
org.apache.curator.RetryLoop.callWithRetry(RetryLoop.java:100)
org.apache.curator.framework.imps.CreateBuilderImpl.pathInForeground(CreateBuilderImpl.java:1153)
org.apache.curator.framework.imps.CreateBuil
Данный курс – перевод малой части супер крутого и популярного открытого курса TheOdinProject. Кроме того, по курсу я нудно и долго делаю видео на youtube. Нудно и долго, но делаю 🙂
Остальные переводы TheOdinProject и не только вы можете найти тут.
Начнем
Сделайте свой сайт динамичным и интерактивным с помощью JavaScript! В рамках траектории вы будете реализовывать разный функционал и автономные приложения. И в конце, объединив все знания воедино, вы создадите финальный проект.
Основы
Добро пожаловать на траекторию JavaScript. Начинаем!
В рамках данного вектора мы рассмотрим более реальные приложения JavaScript и узнаем о нескольких полезных инструментах, которые широко используются в отрасли.
Рассмотрим, что такое API и как с ним работать. Параллельно разберемся с тем, что помогает незаметно от клиента работать с API – асинхронным выполнением задач в JavaScript.
Разработка через тестирование (TTD) – занимает важное место в мире разработке. В этом разделе рассматриваются детали написания автоматизированных тестов JavaScript.
Полноценное веб-приложение нуждается в бэкенде, чтобы соханять свои данные и выполнять необходимые операции. Здесь вы узнаете, как использовать AJAX для отправки данных и запросов к вашему бэкенду на Rails. Так же вы сможете поработать со внешними API, такими как Google Maps, что вы, вероятнее всего, будете делать довольно часто, работая над своими будущими проектами.
Вы изучили все, что вам необходимо, и осталось лишь применить ваши знания в достойной задаче. В этом разделе мы кратко расскажем о том, как тестировать Javascript при помощи Jasmine и затем предложим вам выполнить завершающий проект, в котором вы сможете продемонстрировать все полученные знания.
Любой может помочь нам с развитием данного проекта. На текущий момент мы усердно работаем над контентом по JavaScript, Java, Python, Java и это занимает достаточно много времени, тем более, что делается это на бесплатной основе. Если вам хочется помочь нам, напишите на почту support@vectree.ru или в telegram @vladthelittleone, наша команда введет вас в курс дела.
Чем вы можете помочь:
исправить ошибки,
проверить ссылки на ресурсы или добавить новые,
добавить найденный в интернете полезный контент, открытый курс,
добавить новые уроки, практические задания, тесты,
Welcome to the Hedera CLI Tool, a powerful and intuitive command-line interface designed to streamline your interactions with the Hedera network. Whether you’re a developer needing to set up test environments, automate network-related tasks, or explore the extensive capabilities of the Hedera mainnet and testnet, this tool is your one-stop solution.
The Hedera CLI Tool elegantly addresses the complexities associated with distributed ledger technologies. It simplifies the process of executing actions such as creating new accounts, sending transactions, managing tokens, and associating with existing tokens directly from the CLI. This high level of functionality and ease of use significantly reduces the barrier to entry for developers working on Hedera-based projects.
A key advantage of the Hedera CLI Tool is its potential to enhance your workflow. It’s not just about performing individual tasks; it’s about integrating these tasks into a larger, more efficient development process. With plans for future integration into Continuous Integration/Continuous Deployment (CI/CD) pipelines, this tool promises to be a versatile asset in the automation and management of Hedera network operations.
🎯 Feature requests can be submitted on the Hedera CLI repository as an issue. Please check the issues before submitting a new one and tag it with the Feature Request label.
Before proceeding with the installation and setup of the Hedera CLI Tool, ensure the following prerequisites are met:
1. Node.js Installation
The Hedera CLI Tool requires Node.js (version LTS 16.20.2 or higher). You can check your current version by running node -v in your terminal. If you do not have Node.js installed, you can download it from Node.js official website.
2. Hedera Account Setup
You will need an account on the Hedera network to interact with the ledger. Follow these steps to set up your account:
During the account creation process, you will receive a DER encoded private key and an account ID. The private key corresponds to your OPERATOR_KEY, and the account ID is your OPERATOR_ID. These credentials are essential for authenticating and performing operations using the Hedera CLI Tool.
Make sure to securely store your DER encoded private key and account ID, as they are crucial for accessing and managing your Hedera account.
Installation
1. Clone the repository
Make sure to clone the repository. You can do this by running the following command in your terminal:
Navigate to the repository folder and install the necessary packages using npm. This sets up everything you need to get started with the Hedera CLI Tool.
cd hedera-cli && npm install
3. Build the Package
Compile the package to ensure all components are ready for use.
npm run build
4. Set Up Operator Credentials
Make a copy of the .env.sample file to create your own .env file. This file will store your operator credentials securely.
cp .env.sample .env
Add your operator ID and key for previewnet, testnet, and mainnet. It’s not mandatory to set keys for all networks. If you only want to use one network, you can leave the other credentials blank. Make sure that each operator account contains at least 1 Hbar. We’ve added the default account for the Hiero Local Node.
Next, set up the CLI tool with the command. The --telemetry flag is optional and enables telemetry. By default, telemetry is disabled. Hedera collects anonymous data to improve the CLI tool. For example, it records the command name, not the parameters or any other sensitive information. If you don’t want us to collect telemetry data, run the command without the --telemetry flag.
node dist/hedera-cli.js setup init --telemetry
The setup init command will also create the different operator accounts in your address book (dist/state/state.json file) so you can use them in your commands.
5. Verify Installation
You can verify the installation by listing all accounts in your address book. When you first run this command, you’ll see the operator keys you’ve defined.
When first using the network, the CLI tool will use the testnet network. You can switch to the mainnet or other networks like previewnet or localnet using the following command:
node dist/hedera-cli.js network use mainnet
7. Optional: Setting Up an Alias
To avoid typing the full command each time, you can set an alias in your shell profile. For example, in bash or Z shell, you can add the following line to your .bashrc/.bash_profile or .zshrc. Replace the path with the absolute path to your hedera-cli installation path.
alias hcli="node /Users/myUser/hedera-cli/dist/hedera-cli.js"
Make sure you reload your shell, whether it’s bashrc, zshrc, or another shell profile.
source~/.bashrc
You can verify the alias by listing all accounts in your address book.
hcli account list
If you haven’t added any accounts yet, you should see the same output like in step 5.
8. Optional: Download Example Scripts
You can download example scripts from the examples file and add them to your state. This allows you to quickly test the CLI tool and see how scripting functionality works. You can download the example scripts using the following command:
node dist/hedera-cli.js state download --url https://raw.githubusercontent.com/hashgraph/hedera-cli/main/src/commands/script/examples.json --merge
Connecting the CLI tool with your Local Hedera Network
The Hedera CLI tool can be used to interact with a local Hedera network. This is useful for testing and development purposes. To connect the CLI tool with your local Hedera network, you need to set up a local Hedera network. You can follow the instructions in the Hedera documentation to set up a local Hedera network.
By default, the src/state/config.ts file contains the default configuration for the localnet. You can change the configuration to match your local network by editing the src/state/config.ts file and then setting the operator key and ID using the setup init command. The default configuration for the localnet is:
The localnet network can be configured in your .env file, so you can use the setup init command to add the localnet operator key and ID to your state. The default values for the localnet operator key and ID are:
Each of the commands can be run with the --help flag to display the command’s options and usage.
Use the --quiet flag to suppress the output of the command or the --verbose flag to display more information.
Setup Commands
setup
Overview
The setup command is an essential component of the Hedera CLI tool, designed to initialize and configure your working environment. This command facilitates the process of setting up the CLI with your operator key and ID.
setup init
setup reload
Usage
1. Initialization:
Sets up the CLI with the operator key and ID.
hcli setup init [--telemetry]
Flags:
Telemetry: (optional) Enables telemetry. By default disabled. Hedera collects anonymous data to improve the CLI tool. For example, it records the command name, not the parameters or any other sensitive information.
When executed, the setup command performs several key functions:
Environment Variable Validation:
It reads the PREVIEWNET_OPERATOR_KEY, PREVIEWNET_OPERATOR_KEY, TESTNET_OPERATOR_KEY, TESTNET_OPERATOR_ID, MAINNET_OPERATOR_KEY, MAINNET_OPERATOR_ID, LOCALNET_OPERATOR_ID, and LOCALNET_OPERATOR_KEY variables from the .env file in the root of the CLI project.
State Update:
Once the localnet, previewnet, testnet, and mainnet operator key and ID are validated, these credentials are used to update the dist/state/state.json file, which holds the configuration state of the CLI tool. The command will also add the operator accounts to your address book.
2. Reload Operator Key and Id:
Reload the operator key and ID from the .env file. This command is useful when you add new networks to your .env file and want to update the state, so you can use the new networks.
hcli setup reload [--telemetry]
Flags:
Telemetry: (optional) Enables telemetry. By default disabled. Hedera collects anonymous data to improve the CLI tool. For example, it records the command name, not the parameters or any other sensitive information.
Telemetry Commands
Overview
The telemetry command in the Hedera CLI tool is designed to enable or disable telemetry. This feature allows users to opt-in or opt-out of telemetry data collection. Hedera anonymizes data and only records the command name, not the parameters or any other sensitive information. For example, it records account create but not the account name or ID. The data is used to improve the CLI tool and provide better features and functionality, by trying to understand how users use the CLI. However, the CLI tool uses a UUID to identify the user, so no personal information is collected. This allows us to better understand how users interact with the CLI tool.
telemetry enable
telemetry disable
Usage
1. Enable telemetry:
This command enables telemetry and sets the telemetry variable in the state to 1.
hcli telemetry enable
2. Disable telemetry:
This command disables telemetry and sets the telemetry variable in the state to 0.
hcli telemetry disable
Smart Contract Commands
Overview
The CLI tool uses Hardhat for all smart contract interactions. There are no dedicated commands for smart contracts in the CLI tool. Instead, you can use the Hardhat commands to deploy and interact with smart contracts.
Contract Storage
Contracts are stored in the src/contracts folder. You can create a new contract by adding a new file in this folder. By default, you can find an erc20.sol and erc721.sol files.
Hardhat Scripts
To deploy a smart contract and interact with it, you can use the Hardhat scripts. The CLI tool stores the scripts in the src/contracts/scripts folder. You can create a new script by adding a new file in this folder. By default, you can find a deploy.js file that demonstrates how to deploy the erc20.sol contract.
Configuring Hardhat
Make sure the your hardhat.config.js file is configured correctly to interact with one of the Hedera networks. By default, the CLI tool uses the local network, which is configured for the Hedera Local Node. You can add the mainnet, testnet, or previewnet networks to the Hardhat configuration file.
A sample config is included in the project. If you configure the mainnet, testnet, or previewnet networks, make sure to set the operator key and ID in your .env file in the HEX format. You can see the example config reads the operator key from the .env file using, for example the process.env.TESTNET_OPERATOR_KEY_HEX. Don’t forget to set these HEX-based variables in your .env file.
Note: If you configure an account but don’t provide a URL or accounts array, the CLI tool will fail upon starting. Make sure to provide a valid URL and accounts array for the network you want to use. If you don’t want to use a network, leave it commented out.
Running Hardhat Scripts
If you have added new Hardhat scripts to src/contracts/scripts, you need to compile the contracts first. You can do this by running the following command in the root of the CLI tool:
npx hardhat compile
This command compiles the contracts and generates the necessary artifacts in the dist/contracts folder. The compiled contracts will be used by the Hardhat scripts to deploy and interact with the contracts.
To run a script, make sure to point to the dist folder (after running npm run build) and use the hardhat run command. For example, to deploy the erc721.sol contract, you can run the following command in the root of the CLI tool:
npx hardhat run ./dist/contracts/scripts/erc721/deploy.js --network local
Integrating Hardhat with the CLI Script Blocks Feature
The script feature let’s you execute script blocks. Here’s how you can integrate Hardhat commands into the CLI tool’s script feature:
Next, it’s possible to store data from Hardhat scripts in the args field of the script block you are executing. For example, this allows you to deploy a smart contract and store the contract address in the args field. You can then reference it as a varaible in other commands in this script block or use it in other Hardhat scripts.
conststateController=require('../../../state/stateController.js').default;// default importasyncfunctionmain(){const[deployer]=awaitethers.getSigners();console.log('Deploying contracts with the account:',deployer.address);// The deployer will also be the owner of our token contractconstERC721Token=awaitethers.getContractFactory('ERC721Token',deployer);constcontract=awaitERC721Token.deploy(deployer.address);awaitcontract.waitForDeployment();constcontractAddress=awaitcontract.getAddress();console.log('ERC721 Token contract deployed at:',contractAddress);// Store address in script arguments as "erc721address"stateController.saveScriptArgument('erc721address',contractAddress);}main().catch(console.error);
In this example, the erc721address variable is stored in the args object of the script you are executing. You can then use this variable in other scripts by retrieving it again (stateController.getScriptArgument(erc721address)) and using it in your Hardhat scripts.
Don’t forget to use .default when importing the stateController in your Hardhat scripts, as shown above.
As mentioned, you can build interesting script blocks that combine regular CLI command and the execution of Hardhat scripts. This allows you to automate the deployment and interaction with smart contracts directly from the CLI tool.
{
"name": "account-storage",
"commands": [
"account create -n alice --args accountId:aliceAccId", // Create account and store account Id"hardhat compile", // Compile contracts"hardhat run ./dist/contracts/scripts/account-storage/deploy-acc-storage.js", // Deploy the contract"hardhat run ./dist/contracts/scripts/account-storage/add-account-id.js"// Add Alice's account ID to the contract
],
"args": {}
}
Network Commands
Overview
The network command in the Hedera CLI tool is designed to manage and interact with different Hedera networks. It allows users to switch between networks and list available networks. This flexibility is crucial for developers who need to test their applications in different network environments.
network use
network list
Usage
1. Switching Networks:
This command switches the current network context to the specified network.
hcli network use <name>
Replace <name> with the name of the network you wish to switch to (mainnet, testnet, previewnet, or localnet running the Hedera network locally).
2. Listing Available Networks:
This command lists all available networks you’ve configured for the CLI tool. It’s useful for confirming the network options and ensuring correct network names are used when switching networks.
hcli network list
// Available networks: mainnet, testnet, previewnet, localnet
Description
The network command includes a catch-all for unknown subcommands. If an unrecognized command is entered, it triggers an error message and displays the help text for the network command.
// Invalid network name. Available networks: mainnet, testnet, previewnet, and localnet
Wait Command
Overview
The wait command in the Hedera CLI tool is designed to pause the execution of commands for a specified amount of time. This command is useful for waiting for transactions to be confirmed on the network or the mirror node to update before executing subsequent commands.
The account command in the Hedera CLI tool encompasses a suite of subcommands designed for managing Hedera accounts. These subcommands provide functionalities for creating new accounts, retrieving account balances, listing accounts in the address book, importing existing accounts, and clearing the address book.
Initializes a new Hedera account (the CLI only supports ECDSA keys) with a specified name for internal referencing in the CLI state, and balance. The balance is optional and has a default if not specified. If you set the --name random flag, the CLI tool will generate a random 20-character long name.
hcli account create -n,--name <name> [-b,--balance <balance>]

// Example
hcli account create -n alice -b 100000000
hcli account create -n random
Flags:
-n, –name: (required) A unique identifier for the new account. If you set the name to random, the CLI tool will generate a random 20-character long name.
-b, –balance: (optional) Initial balance in tinybars. Defaults to 1000.
Note: Setting the <name> to random will generate a random 20-char long name. This is useful for scripting functionality to avoid running into non-unique name errors. It’s not allowed to use the word operator as an name or as part of an name because it’s reserved for the operator accounts.
2. Retrieve Account Balance:
Displays the balance of a specified account. Users can choose to view only the Hbar balance or the balance of a specific token. It’s not possible to use both options at once.
Lists all accounts stored in the address book. An optional flag allows displaying private keys.
hcli account list [-p,--private]

// Example output with -p flag
Accounts:
- Name: bob
  Account ID: 0.0.4536938
  Type: ECDSA
  Private Key: 30300201[...]
Flags:
-p, –private: (optional) Displays private keys for each account.
4. Import an Existing Account:
Allows users to import an existing account into the CLI tool using the account’s name, ID, type, and optionally private key. You can import accounts without a private key, but you won’t be able to sign transactions with them.
hcli account import -n,--name <name> -i,--id <id> [-k,--key <key>]

// Example
hcli account import -n alice -i 0.0.5892294 -k 30300201[...]
hcli account import -n alice -i 0.0.12450
Flags:
-n, –name: (required) Set the name for the imported account.
-i, –id: (required) Provide the account ID.
-k, –key: (optional) Provide private key for imported account.
5. Clear All Accounts:
Removes all account information from the address book.
hcli account clear
6. Delete an Account:
Deletes an account from the address book by its name or ID, don’t use both at the same time. If you don’t provide an name or ID, the CLI tool will prompt you to select an account from your address book.
The token command in the Hedera CLI tool provides functionality for creating, associating, and transferring tokens on the Hedera network. It includes subcommands for creating fungible tokens, associating tokens, and transferring tokens between accounts.
token create-from-file
token create
token associate
token transfer
Usage
1. Create Token from File:
This command allows users to create a new token by specifying a JSON file that contains the token’s configuration. Files are stored in the dist/input folder of the project using the format token.<filename>.json. Replace <filename> with your desired filename.
hcli token create-from-file -f,--file <filename>
Flags:
File: (required) Filename containing the token information in JSON format.
A token input file looks like below. You can define all properties you would normally define when using using the SDK to create a token. All of the properties are required except for the min/max values for custom fractional fees. If you don’t need a key, leave it as an empty string.
Note: that you can use placeholders for all keys on a token. The format <name:bob> refers to an account with name bob in your address book. It will use Bob’s key.
You can also tell the CLI tool to create a new account with account type ecdsa and an initial balance in TinyBars. The <newkey:ecdsa:10000> placeholder creates a new ECDSA account with 10,000 TinyBars and uses its key for the admin key.
Here’s how custom fees are defined in the token input file:
"customFees": [
{
"type": "fixed", // Indicates a fixed fee"unitType": "token", // Indicates the denomination of the fee: "token", "hbar", or "tinybar""amount": 1, // Amount of the fee"denom": "0.0.3609946", // If the unit type is "token", then you need to set a denominating token ID to collect the fees in"exempt": true, // If true, exempts all the token's fee collector accounts from this fee."collectorId": "0.0.2221463"// Sets the fee collector account ID that collects the fee.
},
{
"type": "fractional", // Indicates a fractional fee"numerator": 1, // Numerator of the fractional fee"denominator": 100, // Denominator of the fractional fee: 1/100 = 1% fee on the transfer"min": 1, // Optional: Minimum fee user has to pay"max": 100, // Optional: Maximum fee user has to pay because fractional fees can become very costly"exempt": true, // If true, exempts all the token's fee collector accounts from this fee."collectorId": "0.0.2221463"// Sets the fee collector account ID that collects the fee.
}
]
2. Create Fungible Token:
Creates a new fungible token with specified properties like name, symbol, treasury ID, treasury key, decimals, initial supply, and admin key.
Treasury ID: (required) Treasury ID for the fungible token.
Treasury Key: (required) Treasury key for the fungible token.
Name: (required) Name of the fungible token.
Symbol: (required) Symbol of the fungible token.
Decimals: (required) Decimals of the fungible token.
Supply type: (required) Supply type can be either finite or infinite.
Initial Supply: (required) Initial supply of the fungible token.
Admin Key: (required) Admin key of the fungible token.
Note: It’s better to use the token create-from-file if you want to set all properties for a token. The token create command only allows for a couple of options.
3. Associate Token with Account:
Associates a specified token with an account. Both the token ID and the account ID (or name) are required.
hcli token associate -a,--account-id <accountId> -t,--token-id <tokenId>

// Example
hcli token associate -a bob -t 0.0.5892309
Flags:
Account ID: (required) Account ID or name to associate with the token.
Token ID: (required) Token ID to be associated with the account.
4. Transfer Fungible Token:
Facilitates the transfer of a specified amount of a fungible token from one account to another.
To: (required) Account ID to transfer the token to (Can be an name or account ID).
From: (required) Account ID to transfer the token from (Can be an name or account ID).
Balance: (required) Amount of token to transfer. For example, if the token has 2 decimals, you need to transfer 100 to transfer 1 token.
Topic Commands
Overview
The topic command in the Hedera CLI tool provides functionality for creating topics and retrieving information about topics on the Hedera network.
topic create
topic list
topic message submit
topic message find
Usage
1. Create Topic:
Creates a new topic with a specified memo, submit key, and admin key. If you don’t provide any options, a public topic will be generated. Setting the submit key creates a private topic. If you don’t set an admin key, the topic is immutable.
Topic ID: (required) Topic ID to find the message for.
Sequence Number: (optional) Sequence number of the message you want to find.
Sequence Number Greater than: (optional) If you want to find all messages with a sequence number greater than the specified one.
Sequence Number Less than: (optional) If you want to find all messages with a sequence number less than the specified one.
Sequence Number Greater than or Equal: (optional) If you want to find all messages with a sequence number greater than or equal to the specified one.
Sequence Number Less than or Equal: (optional) If you want to find all messages with a sequence number less than or equal to the specified one.
Sequence Number Equal: (optional) If you want to find all messages with a sequence number equal to the specified one.
Sequence Number Not Equal: (optional) If you want to find all messages with a sequence number not equal to the specified one.
Hbar Command
Overview
The hbar command in the Hedera CLI tool is designed for transferring tinybars (1 hbar = 100,000,000 tinybars) between accounts.
hcli hbar transfer -b,--balance <balance> [-f,--from <from>] [-t,--to <to>] [--memo <memo>]

// Example
hcli hbar transfer -f alice -t bob -b 100000000
hcli hbar transfer -f alice -t 0.0.12345 -b 100000000 --memo "Transfer memo"
Flags:
Balance: (required) Amount of tinybars to transfer.
From: (optional) Account ID or name to transfer the hbars from.
To: (optional) Account ID or name to transfer the hbars to.
Memo: (optional) Memo for the transfer.
Note: If you don’t specify a from or to account, the CLI tool will prompt you to select an account from your address book, listed by name.
Backup Commands
Overview
The backup command in the Hedera CLI tool is designed for creating backups of the state.json file, which contains configuration and state information.
backup create
backup restore
Usage
1. Creating Backup:
This command creates a backup of the state.json file. The backup file is named using a timestamp for easy identification and recovery. The format is: state.backup.<timestamp>.json. The backup is stored in the same dist/state directory as state.json. It’s possible to provide a custom name for the backup file: state.backup.<name>.json.
Further, you can also provide a custom path for your backup, which is useful if you want to export a clean testing state in another application that can be used to run E2E tests.
Name: (optional) Filename of the backup file. Defaults to state.backup.<timestamp>.json.
Accounts: (optional) Creates a backup of the accounts section of the state. The backup file is named accounts.backup.<timestamp>.json.
Safe: (optional) Removes private information from the backup like token keys, account keys, and operator key/ID. It does not remove the private keys in scripts’ commands.
2. Restoring Backup:
This command restores a backup of the state.json file stored in the same dist/state directory, it can’t detect backups stored elsewhere. It only restores state files with the format *.backup.*.json. If you don’t provide a filename, the CLI tool will list all available backups that match this pattern and ask you to select one.
File: (optional) Filename of the backup file to restore. If you don’t provide a filename, the CLI tool will list all available backups and ask you to select one.
Restore Accounts: (optional) Restores the accounts section of the state.
Restore Tokens: (optional) Restores the tokens section of the state.
Restore Scripts: (optional) Restores the scripts section of the state.
Example: You can combine the flags to restore only certain parts of the state. For example, you can restore only the accounts and tokens section of the state by using the following command:
Note: If you don’t provide a filename, the CLI tool will list all available backups and ask you to select one. You can still use the flags to restore only certain parts of the state.
State Commands
Overview
The state command in the Hedera CLI tool is designed for managing the state of the CLI tool. It allows users to view the current state, clear the state, and download a new state via a remote URL.
state download
state view
state clear
Usage
1. Download State:
Downloads a state file from an external URL and add it to the dist/state.json file. You can use this command to update your state with new accounts, tokens, or scripts. You can choose to overwrite the current state or merge the downloaded state with the current state.
hcli state download --url <url> [--overwrite] [--merge]
Flags:
URL: (required) URL to download the state file from.
Overwrite: (optional) Overwrites the current state file with the contents of the downloaded file.
Merge: (optional) Merges the downloaded state file with the current state file. It won’t fail when the state file contains duplicate keys.
Accounts: (optional) Displays the accounts section of the state.
Tokens: (optional) Displays the tokens section of the state.
Scripts: (optional) Displays the scripts section of the state.
Account Name: (optional) Displays the account with the specified name.
Account ID: (optional) Displays the account with the specified ID.
Token ID: (optional) Displays the token with the specified ID.
3. Clear State:
Clears the state of the CLI tool. This command is useful for resetting the state to its initial state. Depending on the flags provided, it resets the entire state or skips certain parts of the state, such as the accounts, tokens, or scripts sections in your state. For example, this might be useful when you want to reset your state but keep your address book (state.accounts).
hcli state clear [-a,--skip-accounts] [-t,--skip-tokens] [-s,--skip-scripts]
The script command in the Hedera CLI tool allows users to load and execute script blocks. This command is particularly useful for automating repetitive tasks or for quickly setting up specific states or environments that have been captured in a script.
script load
script list
script delete
Usage
1. Load and Execute Script Blocks:
Loads a script by name from state and sequentially executes each command in the script.
hcli script load -n,--name <name>
Each command is executed via execSync, which runs the command in a synchronous child process. Scripts are stored in the dist/state.json file, in the scripts section.
Make sure to append each script with script- prefix. The name of the script is just the name without the script- prefix. If you want to load this script, you use hcli script load -n erc721, without the script- prefix.
Lists all scripts stored in the dist/state.json file.
hcli script list
3. Delete Script:
Deletes a script from the dist/state.json file.
hcli script delete -n,--name <name>
Dynamic Variables in Scripts
The dynamic variables feature in our script execution command (script load) allows you to store variables during script execution and reference them in other commands within the script. This feature enhances script flexibility and reusability by enabling you to replace options with arguments or state variables, and store and retrieve variables as needed.
The following example shows how you can use dynamic variables to create a script that creates three accounts, creates a token, associates the token with the third account, and transfers one token from the second account (treasury) to the third account. Then, it displays the token state and the balance of the third account. Often, it will tell you that the third account has a 0 balance because the mirror node hasn’t updated yet. When a command fails, the script execution stops and the error is displayed.
Make sure to not use a space between the variable name and the arrow notation (:). Otherwise, the CLI tool will not recognize the variable. --args name:nameAcc1 is correct, --args name : nameAcc1 is not.
The below command shows how to create a new account on testnet with 1 hbar and prints the hbar balance.
This example shows how to use Hardhat scripts as part of your flow, mixing it with other commands. It creates a random account, waits for 3 seconds, and then runs a Hardhat script to deploy contracts:
The Hedera CLI tool stores its state in the dist/state/state.json file. This file contains all the information about your accounts, tokens, scripts, and network. You can edit this file manually, but it’s not recommended.
Contributions are welcome. Please see the contributing guide to see how you can get involved in the Hedera Hashgraph repositories. Below you can find some tips specific for this repository.
Development Mode
You can run the application in development mode. It will watch for changes in the src folder and automatically recompile the application while maintaining the dist/state.json file.
To get started, create a new state file called test_state.json in the /src/state/ folder.
cd src/state
touch test_state.json
Next, copy the contents of the src/state/base_state.json file into the test_state.json file.
Once that’s done, you can start the application in development mode using the following command:
npm run dev-build
Further, you can lint or format the code using the following commands:
npm run lint
npm run format
Config
How to handle config?
If you add features that affect the initial config, make sure to update both the state/config.ts and types/state.d.ts files.
Unit Testing
You need to create a local clone of commander program each time you run a unit test to ensure test encapsulation: const program = new Command();
Use program.parseAsync if you are testing an asynchronous command.
const{ Command }=require('commander');constnetworkCommands=require("../../commands/network");constfs=require("fs");describe("network commands",()=>{describe("network switch command",()=>{test("switching networks successfully",()=>{// Arrangefs.readFileSync=jest.fn(()=>JSON.stringify({network: "mainnet"}));// Mock fs.readFileSync to return a sample configfs.writeFileSync=jest.fn();// Mock fs.writeFileSync to do nothing//console.log = jest.fn(); // Mock console.log to check the log messagesconstprogram=newCommand();networkCommands(program);// Actprogram.parse(["node","hedera-cli.js","network","use","testnet"]);// Assertconstopts=program.opts();expect(opts.network).toBe("testnet");// expect(program.args).toEqual(["--type", "order-cake"]);// Check that console.log was called with the correct messageexpect(console.log).toHaveBeenCalledWith("Switched to testnet");// Check that fs.writeFileSync was called with the updated configexpect(fs.writeFileSync).toHaveBeenCalledWith(expect.any(String),// pathJSON.stringify({network: "testnet"},null,2),"utf-8");});});describe("network switch ls",()=>{// [...]});});
E2E Testing
The E2E tests run on localnet and use the state from the dist/state/state.json file.
Dynamic Variables
Dynamic variables are variables that are stored in the state and can be used in scripts. They are useful for storing information that is generated during script execution and can be used in other commands within the script.
How to allow processing of dynamic variables in a command?
To allow processing of dynamic variables in a command, you need to add a single line of code converting the dynamic variables in your options to their actual values. Don’t forget to import the dynamicVariablesUtils which holds the replaceOptions function.
To allow dynamic variables in a command, you need to add the --args flag to the command. The --args flag takes a list of arguments that are allowed to be dynamic variables.
Further, for each command you want to allow the user to store variables, you need to define a command action. Command actions define the mapping between script commands and the corresponding actions. You can specify actions for different commands and use them when storing variables.
Next, you can define command outputs for your action. Command outputs define the output variables that can be captured and stored for specific actions. You can specify the output variables for each action to use them later in the script.
constcommandOutputs: CommandOutputs={accountCreate: {name: 'name',accountId: 'accountId',type: 'type',publicKey: 'publicKey',evmAddress: 'evmAddress',solidityAddress: 'solidityAddress',solidityAddressFull: 'solidityAddressFull',privateKey: 'privateKey',},// Define outputs for other actions here};
Make sure that each property you define exists in the output for the command. Here’s the code for the accountCreate command. The accountDetails output contains all the properties defined in the commandOutputs object. If you define a property in the commandOutputs object that doesn’t exist in the accountDetails output, the script execution will fail.
.action(async(options: CreateAccountOptions)=>{options=dynamicVariablesUtils.replaceOptions(options);try{letaccountDetails=awaitaccountUtils.createAccount(options.balance,options.type,options.name,);// Store dynamic variablesdynamicVariablesUtils.storeArgs(options.args,dynamicVariablesUtils.commandActions.account.create.action,accountDetails,);}catch(error){logger.error(errorasobject);}});
The storeArgs function takes the options.args and the commandAction as arguments. It then stores the output variables in the state according to the user’s instructions.
Whenever changing the commandActions or commandOutputs objects, make sure to update the documentation as well.
Logging
You can use the logger object to log messages to the console. The logger object is defined in src/utils/logger.ts. It is defined as a singleton which you can import in your files.
Welcome to Rgpv Notes, your go-to platform for academic resources at Rajiv Gandhi Proudyogiki Vishwavidyalaya (RGPV). Streamline your academic journey with our comprehensive study materials and more!
Rgpv Notes is a platform designed to assist students at Rajiv Gandhi Proudyogiki Vishwavidyalaya (RGPV). It provides free access to a variety of study materials, previous year’s question papers, and the latest university news. Our platform serves as a one-stop-shop, making academic preparation seamless and convenient for RGPV students.
Built With
Rgpv Notes is crafted using Astro and Vue.js, ensuring a performant and dynamic user experience. Astro optimizes the loading of static content, while Vue.js powers the interactive elements, providing an efficient and responsive platform for all users.
Services List
Study Material: Access a wide range of study materials to excel in your coursework. Explore Now
Public API’s: Explore our public APIs to integrate Rgpv Notes data into your own applications. Discover API
Simply install it through the top menu Extras > Installer and search for SimpleSearch. Install it from there. After installing it, it is recommended to clear your MODX cache, through the top menu Manage > Clear Cache.
Upgrade risks
This is currently alpha software and is only compatible with MODX 3.x and higher. This has been tested on basic search queries, but you may encounter problems with more advanced setups.
Autosuggest
A processor has been provided for retrieving a list of search suggestions based on a Template Variable containing a comma delimited list of search terms.
You can configure the TV to use by setting simplesearch.autosuggest_tv, which can either be the TV name or id.
You can use the example (requires jQuery) code below for retrieving a list of search suggestions.
Building Web App: Spring Boot + PostgreSQL + Angular
Overview
This is cheat sheet about developing a full-stack application from scratch by using Spring Boot, PostgreSQL (as a database)
and Angular.
Basic Steps:
Note: You could start with the user interface or your database or the server code. There’s no right or wrong choice.
build out the Spring Boot server
build up the persistence tier and set up the database
build the Angular front end
App Description
Create a registry system for Bike Company that can keep track of all of the users’ purchases. When a customer purchases
a bike from the company, they can come to this website and enter their purchase details on this form and complete their
bike registration to enable their warranty.
Registry form:
buyer name
email
phone number
model of bike
bike serial number
purchase price
purchase date
boolean contact that says whether we can contact that person or not
Submit button → after it is clicked, the form will clear itself and there will pop up a success message at
the top that will say the registration has been submitted.
That will be the end user portion of the system. There will also be an admin section of the system, for company employees
to see all of the registrations. Employees will be able to access the url “/admin” and the app will prompt with
a login. Once the employee enters their credential, they will get to the admin screen and it will show all of the
different bikes that have been registered.
Login + Admin screen:
all registered bikes and the information about them
Prerequisites
Note: I use Linux operating system
Java 11
Maven 3.6.3
Postman – to help you test and try out your REST API endpoints
spring init -l=java -g=com.dmilusheva -a=bikecompany -n=bikecompany --description="Bike company application" --package-name=com.dmilusheva.bikecompany -d=web,jpa,postgresql --build=maven -p=jar -j=11
Run the app with mvn spring-boot:run and browse http://localhost:8080. You will see a Whitelabel Error Page. This actually means Spring Boot is
up and running, we just haven’t defined any root or home page that it can respond to.
Adding a Basic Model
Create a new package: package com.dmilusheva.bikecompany.models
Create a new class: Bike.java
Add the following attributes: name, an email, a phone, a model, and a serial number, a purchase price,
purchase date and contact
Add getters and setters for this class.
Creating a REST Controller
Create a REST controller that will serve out some bike information via an API.
Create an API endpoint to pass the bike information around.
Create a new package: package com.dmilusheva.bikecompany.controllers
Create a new class: BikesController.java
Add annotations: @RestController and @RequestMapping
BikesController is a Spring MVC controller so we should add a couple of annotations so that Spring will pick it up
and process it correctly.
To test out our endpoints we simply need to start up our Spring Boot server and then make a call to the endpoints.
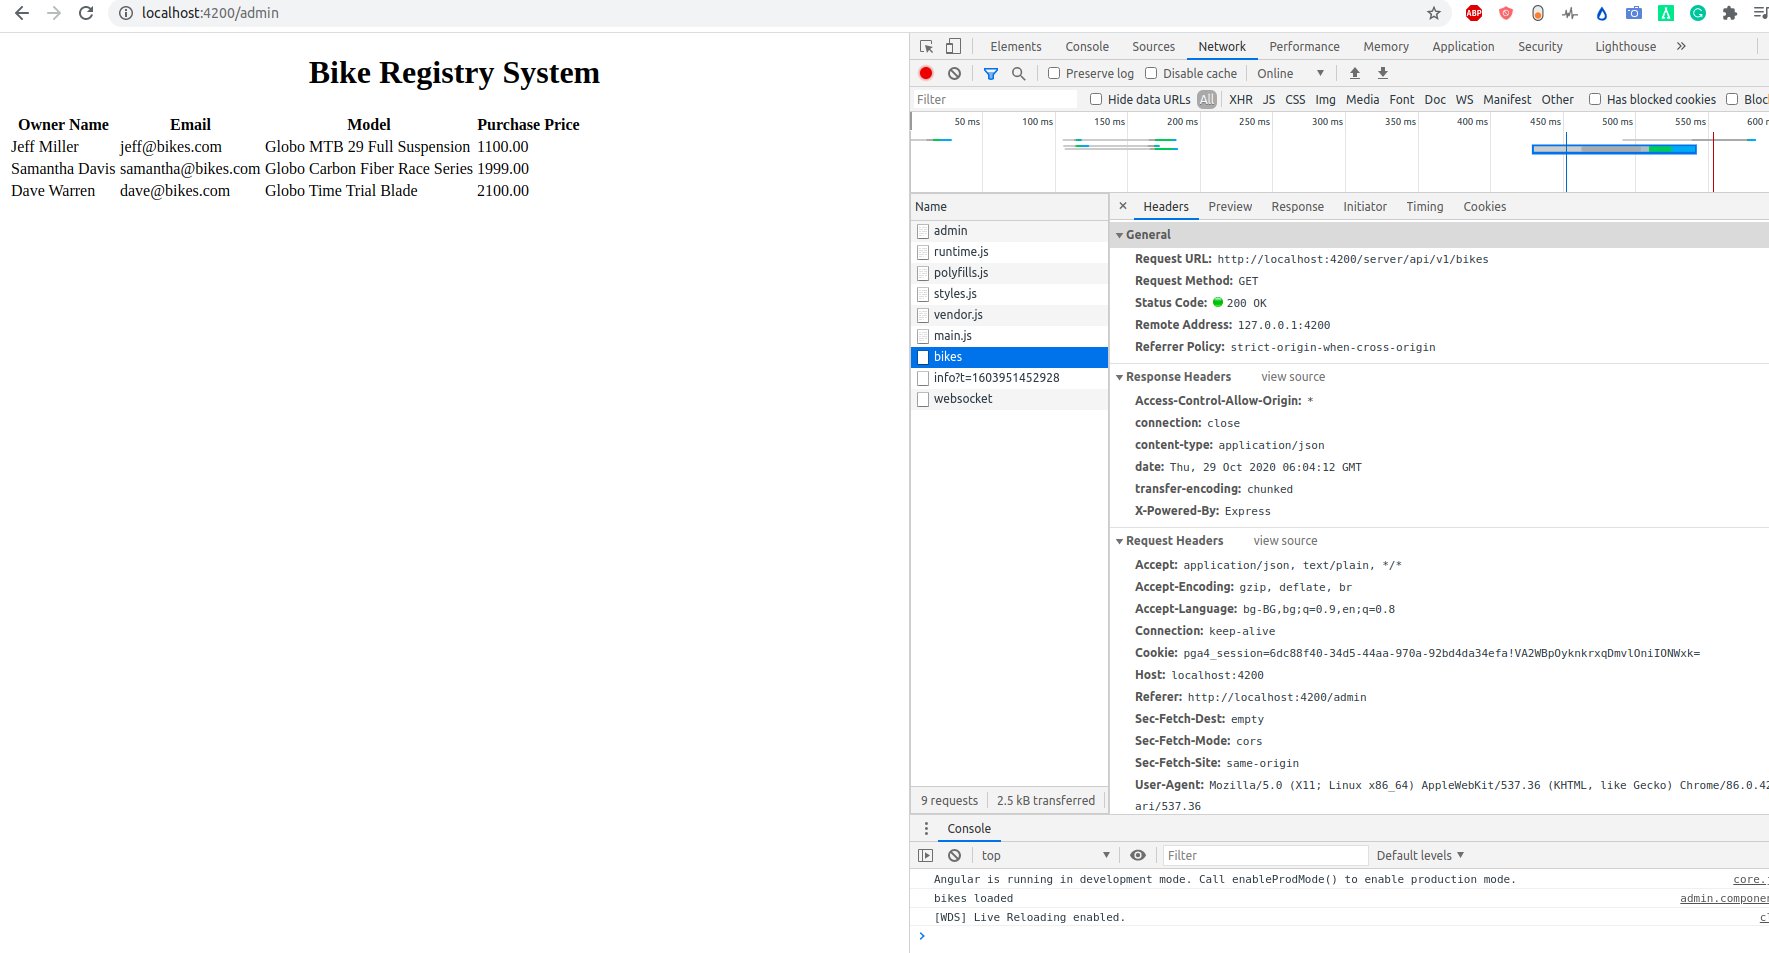
Browse http://localhost:8080/api/v1/bikes or open Postman set method to GET and url to
localhost:8080/api/v1/bikes and you will see empty JSON array []. That means that our Spring Boot controller
is working. We’re simply returning an empty array, which when it comes to JSON is the square brackets.
Adding a Persistence Layer
Turn the basic Bike object into a JPA entity that can be persisted to a database. Once persistence is added,
the basic server API portion of the app will be complete.
We need the ability to save bike registrations and in order to do that we’ll need a database. We could pick just
about any database out there, but I am going to use PostgreSQL. Once the database is installed, we can then add
persistent support to the Spring Boot app. Spring provides a great library called Spring Data JPA that enhances the
basic JPA object relational persistence framework. We’ll be using this in our application. We can then convert the bike
basic java model class that we have already created and turn that into a JPA entity persistable class.
Add a Spring Data JPA repository and this will act as a data access layer for the Bike entity.
The application still does not know how to connect to the database. Go to src/main/resources folder and open
application.properties file. This file is typically used for any kind of configuration in the Spring Boot
environment and most of the libraries that Spring Boot integrates with, have a lot of customized configurable options.
Add properties.
Creating a JPA Entity
Annotate Bike.java model class as an actual entity – @Entity
Create a new attribute called id, which represents the primary key id for this class and I’m going to set it to
the Long data type. Add getter and setter. Add annotations @Id and @GeneratedValue.
Creating a JpaRepository
The JPA repository in Spring Data JPA acts as a data access object (DAO).
Create an API endpoint to pass the bike information around.
Create a new package: package com.dmilusheva.bikecompany.repositories
Create a new interface: BikeRepository.java
Test the API
In Postman we can test the API all the way down to the database layer by calling the endpoints.
Create Angular bike-company-ui app, as a stand-alone project.
sudo ng new bike-company-ui -routing
sudo chmod -R 777 bike-company-ui/
Note: If you have a problem with the last command, try to do next two steps and run the command again.
npm cache clean --force
npm i -g @angular/cli
To check if every thing is ok:
cd bike-company-ui
ng -v
Start up the app:
npm start
OR
ng serve
Check the app at localhost:4200 .
Go to ~/bike-company/bike-company-ui/src/app/app.component.html and edit the HTML.
Setup a proxy.
The proxy will forward requests from the Angular server running on port 4200,
to the Spring Boot server running on port 8080. To do that, create a new file for the proxy configuration:
~/bike-company/bike-company-ui/proxy.conf.json
The file says to the ng JavaScript server, that if it sees any requests that come into it, that begin with “/server”,
it should forward them on ***http://localhost:8080***.
Now, we should tell the Angular server to use the new proxy server that we just set up.
Go to ***~/bike-company/bike-company-ui/proxy.conf.json*** and replace line “`”start”: “ng serve”,“` with
“`”start”: “ng serve –proxy-config proxy.conf.json”,“`.
#
### To check everything work fine:
* Open a new terminal and start your Spring Boot app:
“`
cd ~/bike-company/bike-company
kill -9 $(lsof -t -i:8080)
mvn spring-boot:run
“`
Open a new terminal and start your Angular app:
cd ~/bike-company/bike-company-ui
kill -9 $(lsof -t -i:4200)
npm start
Add a services to your Angular app (this is easy to be done with Angular CLI).
In the folder bike-company-ui, generate (g is for generate) service with name bike-company and
put everything in the services package:
ng g service services/bike-company
Now we have ~/bike-company/bike-company-ui/src/app/services/ where a two new files are created.
Go to ~/bike-company-ui/src/app/app.module.ts and import the new BikeCompanyService by adding
import { BikeCompanyService } from './services/bike-company.service';.
Add providers array providers: [BikeCompanyService],.
Import also import { HttpClientModule } from '@angular/common/http';, it is the new HttpClientModule, which is
rewritten in Angular 4, and it is what allows us to talk with calls to our server back-end. We should also add it to
Go to bike-company.service.ts and add the two imports:
import { HttpClient, HttpHeaders } from '@angular/common/http';
import { Observable } from 'rxjs/Observable';
The HttpClient is responsible for making the calls out. Observable is going to return an observable, which is like
a promise that will come back with the information from the server. To make the HttpClient usable in our code we are
simply going to inject it into the BikeCompanyService class by adding it to the constructor
parameter list constructor(private http:HttpClient).
Next let’s create a function that will allow us to get all of the bikes from our database. So the service function name
will be getBikes() and it is going to return the payload from this following url /server/api/v1/bikes.
When we set up the proxy- anything that begins with /server/.. is going to get proxied over to Spring Boot and
then anything on the following path after /server/.., will be the path that is used on the Spring Boot server.
So we are just going to take the server and forward on /api/v1/bikes to Spring Boot. This will get returned to the
getBikes() method and will be returned as an observable.
Set up some HTTP options as a constant by adding:
const httpOptions = {
  headers: new HttpHeaders({'Content-Type': 'application/json'})
};
Add a components to your Angular app (this is easy to be done with Angular CLI).
In the folder bike-company-ui, generate (g is for generate) component with name admin and
put everything in the components package:
ng g component components/admin
Now we have ~/bike-company/bike-company-ui/src/app/components/admin where a new files are created.
Go to admin.component.ts and import the new BikeCompanyService by adding
import { BikeCompanyService } from '../../services/bike-company.service';.
To make the BikeCompanyService usable in our code we are going to inject it by adding it to the constructor
parameter list constructor(private bikeCompanyService: BikeCompanyService).
Create a public variable to hold all of the bikes that are returned from the back-end by adding “`public bikes;“.
At this point we can now make a call over to the BikeCompanyService to retrieve all the bikes and store them in this
public bikes variable. So let’s add a new function to do that:
What is happening in this function? We are going to call the bikeCompanyService that we have just created. We will call
the getBikes() method, which returns an observable. We will subscribe to that. We can then either get the
data data => { this.bike = data}, or we will get an error back err => console.error(err),. We can log out to
the console that our bikes were loaded () => console.log('bikes loaded'). And finally, this method is not going to get called
unless we tell the component to call it. Just by defining it doesn’t mean that it will get called. We need to tell it
when and how to be called and we can do that in the ngOnInIt() function by adding this.getBikes();. At this point
the component should be wired up and ready to display the bikes.
Update the HTML to actually loop through all of the bikes and display them in HTML format. The HTML is located in
admin.component.html and a general basic HTML stub was put in place when we created this component, but we want to
replace it with something that will display our bikes. So edit it.
At this point we are ready to test the UI. We have wired in a component to the service, which talks to the back-end
through our proxy. The last thing we need to set up is the router so that we can navigate to it correctly from the browser.
#
Setting up the Router.
We need to set up the Angular routing portion of the application. When we specified the –routing switch when we created
this project, it created the ~/bike-company-ui/src/app/app-routing.module.ts file. This is where your routes will
go andconstants a defined routes for your application in const routes: Routes = []; . Creat the admin route which
is consists of an admin path with the component, which is our admin component.
{
path: 'admin',
component: AdminComponent
}
Import that as well by adding import { AdminComponent} from './components/admin/admin.component';.
Finally, to finish setting up the router properly you need to make sure that in the app.component.html file we have
the router outlet set up. At the bottom of this file we will specify the router-outlet tag by adding
<router-outlet></router-outlet>. This sets up the basic app component as the layout or a template, which means that
we will always have the header Bike Registry System, for all files or all URLs. To check everything work fine:
Brows http:/localhost:4200/admin and you should see this:
Finish the Angular Screens
In ~/bike-company-ui/src/app/services/bike-company.service.ts, add getBike(id: number) and
createBikeRegistration(bike) methods.
Add a new component for the home page, to your Angular app (this is easy to be done with Angular CLI).
In the folder bike-company-ui, generate (g is for generate) component with name home and
put everything in the components package:
ng g component components/home
Go to app-routing.module.ts and import the new component by adding
import { HomeComponent} from './components/home/home.component';. Create a new path for it:
  {
    path: '',
    component: HomeComponent
  },
* Go to ***home.components.ts*** and add “`import { BikeCompanyService } from ‘../../services/bike-company.service’;“`.
Also edit the constructor: “` constructor(private bikeCompanyService: BikeCompanyService) { }“` >
Create and validate all forms, again into this file.
Add some html into ***home.components.html***
Go to app.module.ts and add import { ReactiveFormsModule } from '@angular/forms';. Also edit:
Add a new component for the home page, to your Angular app (this is easy to be done with Angular CLI).
In the folder bike-company-ui, generate (g is for generate) component with name view-registration and
put everything in the components package:
ng g component components/view-registration
Go to app-routing.module.ts and import the new component by adding
import { ViewRegistrationComponent} from './components/view-registration/view-registration.component';. Create a new path for it:
Go to iew-registration.components.ts and add import { BikeCompanyService } from '../../services/bike-company.service'; . Also edit the constructor: constructor(private bikeCompanyService: BikeCompanyService) { }
Add variable bikeReg and method getBikeReg(id: number) .
Also import import { ActivateRoute } from '@angular/router'; .
Edit ngOnInit():
For each framework is developed a small application that handles a counter and a list that can be dynamically appended and cleared by UI.
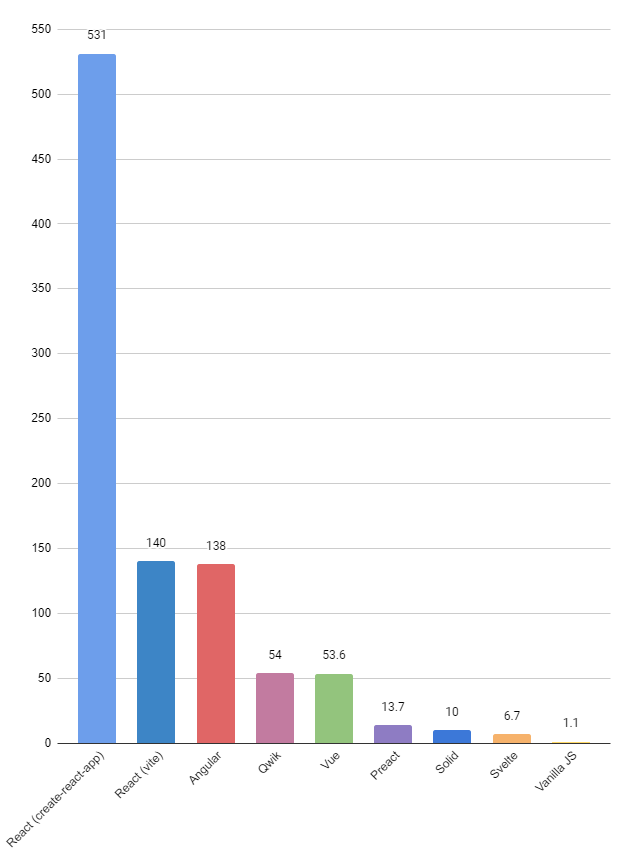
The well-known JS web frameworks benchmark conducted by Krausest focuses on CPU speed execution, Lighthouse mobile simulation, and memory allocation. While it is valuable to understand the performance of the framework we are working with or considering, an important factor to consider is the size of the final built bundle that contains minified JS code. Nowadays, most devices can easily handle complex websites. However, websites are often refreshed frequently, sometimes with every page change by the user. This raises the issue of the web application’s size, as it affects page loading speed, file interpretation speed, user experience, and network traffic. It is desirable to keep the bundled website as small as possible to minimize network traffic and ensure the best possible user experience in terms of loading time. This project analyzes the sizes of the minified JS bundles for the same simple web application in some of the most commonly used JS frameworks.
Results
React create-react-app
React vite
Angular
Preact Vite
Svelte
Vue vite
Solid
Qwik
Vanilla JS
Size of built JS (KB)
531
140
138
13.7
6.73
53.6
9.96
54.0
1.11
Size of dev folder (KB)
292 511
102 757
481 411
70 761
103 418
107 088
96 100
168 932
3.6
Version
18.2.0
18.2.0
14.2.3
10.13.1
3.55.1
3.2.45
1.6.10
0.20.1
–
Size of minified JS bundle in KB
Lower is better
Qwik is a little bit different because all js is not interpreted after the page is rendered, though the minimum bundle size remains large (42.5 KB).
Size of development folder in MB
Including node modules
Lower is better
Expressiveness and Simplicity of syntax
In my opinion:
Svelte and Vue(using Components API) wins the battle, they provides the simplest and most declarative syntax.
Angular has also a pretty clean syntax on top of a nice organisation of components. Though, it can result in a lot of src files to handle.
React and Solid components return JSX that contains JavaScript expression, this focus on more and smaller reusable components (especially compared to Angular components), but have the drawback to mix HTML and JS code together, so it can be confusing, and the MVC is hard to achieve.
In any case, vanilla JS is to be avoided for any kind of projects.
Details on each framework
Solid
Size of development folder: 91.6 MB
Contains:
Files: 2307
Folders: 361
Size of built app: 27.7 KB
Size of minified JS files: 9.96 KB
Components: functions that returns JSX or TSX
State: const [a, setA] = createSignal('val');
Primitives: createEffect(() => console.log(a + ' updated')); and const aa: Type = createMemo(() => a + a;
npm i
npm run dev
npm run build
Svelte
Size of development folder: 98.6 MB
Contains:
Files: 1535
Folders: 341
Size of built app: 9.78 KB
Size of minified JS files: 6.73 KB
Components: .svelte file separating script, template and style
State: let a: Type = 'val';
Primitives: $: console.log(a + ' updated')); Simplest and cleanest syntax so far
npm i
npm run dev
npm run build
Vue
Size of development folder: 102 MB
Contains:
Files: 3267
Folders: 499
Size of built app: 59,2 KB
Size of minified JS files: 53,6 KB
Components: .vue file separating script, template and style. I used components API
State: let a: Type = 'val';
npm i
npm run dev
npm run build
Angular
Size of development folder: 459 MB
Contains:
Files: 40942
Folders: 3676
Size of built app: 153 KB
Size of minified JS files: 138 KB
Components: generated folder containing 4 files, model and controler is a TypeScript class
State: a: Type = 'val'; as a class attribute (in ts file, need to access them with this keyword)
Primitives: Not native to Angular, pretty verbose
npm i
ng s
ng build --configuration production
React (create-react-app)
Size of development folder: 278 MB
Contains:
Files: 36800
Folders: 34805
Size of built app: 540 KB
Size of minified JS files: 531 KB
Components: JSX or TSX files, function that returns JSX
State: const [a, setA] = useState<Type>('val'); as a class attribute
npm i
npm start
npm run build
React (npm init vite@latest)
Size of development folder: 97.9 MB
Contains:
Files: 2254
Folders: 320
Size of built app: 144 KB
Size of minified JS files: 140 KB
npm i
npm run dev
npm run build
Preact (vite)
Size of development folder: 70.8 MB
Contains:
Files: 2452
Folders: 373
Size of built app: 18.8 KB
Size of minified JS files: 13.7 KB
npm i
npm run dev
npm run build
Qwik
Size of development folder: 97.9 MB
Contains:
Files: 6187
Folders: 969
Size of built app: 75.1 KB
Size of minified JS files: 54 KB
npm i
npm start
npm run build
I used SSG (Static Site Generation) for this Qwik projectnpm run qwik add
Vanilla JS
Size of development folder: 3.50 KB
Contains:
Files: 4
Folders: 1
Size of built app: 3.50 KB
Size of JS: 1.11 KB
Components: import js files
State: need to work with the DOM
Primitives: need to code one’s own framework
Expressiveness
Here I put side to side all code to manage the list (creation, push, empty)
Angular
<inputtype="text" (change)="sendMessage($event)" /><app-message*ngFor="let elem of list" [message]="elem"></app-message><button(click)="emptyList()">Empty</button>
Please contact the first author for questions about the code or data requests: Nathan Hostetter (njhostet@uw.edu)
Abstract:
Background: Acoustic telemetry technologies are being increasingly deployed to study a variety of aquatic taxa including fishes, reptiles, and marine mammals. Large cooperative telemetry networks produce vast quantities of data useful in the study of movement, resource selection and species distribution. Efficient use of acoustic telemetry data requires estimation of acoustic source locations from detections at receivers (i.e., “localization”). Multiple processes provide information for localization estimation including detection/non-detection data at receivers, information on signal rate, and an underlying movement model describing how individuals move and utilize space. Frequently, however, localization methods only integrate a subset of these processes and do not utilize the full spatial encounter history information available from receiver arrays.
Methods: In this paper we draw analogies between the challenges of acoustic telemetry localization and newly developed methods of spatial capture-recapture (SCR). We develop a framework for localization that integrates explicit sub-models for movement, signal (or cue) rate, and detection probability, based on acoustic telemetry spatial encounter history data. This method, which we call movement-assisted localization, makes efficient use of the full encounter history data available from acoustic receiver arrays, provides localizations with fewer than three detections, and even allows for predictions to be made of the position of an individual when it was not detected at all. We demonstrate these concepts by developing generalizable Bayesian formulations of the SCR movement-assisted localization model to address study-specific challenges common in acoustic telemetry studies.
Results: Simulation studies show that movement-assisted localization models improve point-wise RMSE of localization estimates by > 50% and greatly increased the precision of estimated trajectories compared to localization using only the detection history of a given signal. Additionally, integrating a signal rate sub-model reduced biases in the estimation of movement, signal rate, and detection parameters observed in independent localization models.
Conclusions: Movement-assisted localization provides a flexible framework to maximize the use of acoustic telemetry data. Conceptualizing localization within an SCR framework allows extensions to a variety of data collection protocols, improves the efficiency of studies interested in movement, resource selection, and space-use, and provides a unifying framework for modeling acoustic data.
Code
simulation_analysis: This folder contains the code to simulate and analyze data. It also generates the JAGS file for the Bayesian implementation.
Data
All data are reproducible from the simulation script.
Installing 4chan X is required for StyleChan to work.
Firefox: Requires the Greasemonkey addon. Click the Install link above.
Chrome: Requires the Tampermonkey extension. Click the Install link above. Alternatively you can download a .crx here if you are using Chromium or are not using Windows. Drag&drop into the extensions page to install.
Pale Moon: Requires the Greasemonkey addon. Click the Install link above.
MS Edge: Requires the Tampermonkey addon. Click the Install link above.
Troubleshooting
If you have any problems, try first resetting your 4chan X and StyleChan settings and restarting your browser
Check if it’s not a 4chan X issue first, StyleChan mostly deals with stylesheets not site functionality
Something doesn’t work let me know in the Issues page
All assets keep their original copyright and can’t be considered to be MIT-licensed.
The authors of this game have no copyrights of these assets. The game (code from this repository) is provided as a demonstration and is not a commercial product.