Blog

  • kphp-game

    KPHP Game

    preview

    About

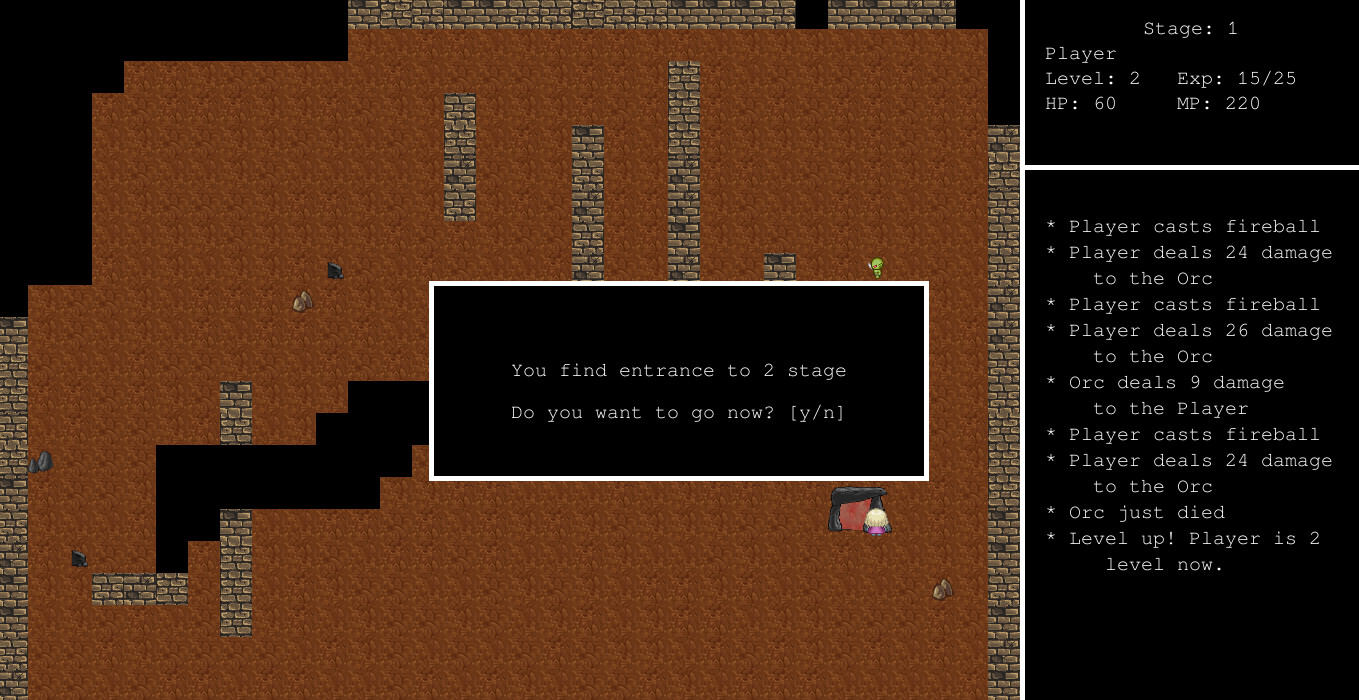
    This is a game written in PHP using kphp-sdlite library.

    Gameplay video: https://www.youtube.com/watch?v=L44l4Tqm4Fc

    This game features:

    • Audio processing (music, sound effects)
    • Animations (spell effects)
    • Text rendering and UI components
    • Event polling (keyboard controls)

    It’s a showcase that KPHP can be used to build applications like this.

    Note that this game is written in 1 day during a hackathon. The code quality may be lacking.

    Building a game

    Our build scripts expect a symlink to an appropriate kphp2cpp in the root of the project.

    Example layout:

    kphp-game/
      kphp2cpp <- this is a symlink you need to provide
      scripts/...
      src/...
    
    # If successfull, game binary can be found at ./bin/game
    $ make game

    Tested on:

    • Ubuntu (amd64 platform)
    • Mac OS (amd64 platform)

    Running with PHP

    $ make run-with-php

    Playing the game

    Controls:

    • Q – use first spell, fireball
    • W – use second spell, ice shards
    • E – use third spell, thunder
    • arrows (left, right, up, down) – move
    • Esc – exit game
    • y (when asked) – accept
    • n (when asked) – decline

    Credits / Attribution

    All assets keep their original copyright and can’t be considered to be MIT-licensed.

    The authors of this game have no copyrights of these assets. The game (code from this repository) is provided as a demonstration and is not a commercial product.

    Visit original content creator repository https://github.com/quasilyte/kphp-game
  • MameRomCheck

    [ updated 1st of March 2020 ]

    MameRomCheck

    yet another tool to manage Mame Roms – ui and api

    it has a gui (tkinter or gtk) and an api. This is very early release, but non destructive,
    since it only get informations and dont touch anything (for now..)

    Goal is to Provide a ‘simple’ user interface and a python api to get efficient romset listing inside Mame
    without weeks of self-education about how Mame work :

    • check wether a rom is really playable (not only marked as working)
    • check several romsets against several releases of Mame
    • remove duplicates, move roms in the right place
    • integrate into existing mame tools eco-system
    • click on a romset and run the compatible Mame release.

    Goal is not to compete with very powerful analysis tools like clrMamePro or romCenter.
    But both needs a lot of self eductation about how Mame work, and so far I was not able to automatically check wether a romset
    is really playable or not / to only keep the playable romsets in my roms directories.

    environment(s) :

    • Windows 10 for now

    for GTK interface :

    • python3.8.2 from mingw64
    • the GTK library

    for TKinter interface :

    • python3.7+ for windows from python.org
    • PIL (pip install pillow)

    this should work in other context, provided you use a Python 3.7+ release, but didn’t get the chance to test yet.

    installation :

    • unzip master and open a cmd shell.
    • it needs 3 files from the 7-zip project to run : these can be found in the 7zip 19.00 64-bit x64 version, on the 7-zip.org website :
      https://www.7-zip.org/download.html. direct download link
    • the 7z1900-x64.exe can be open as an archive with 7zip to get the files
    • If you didnt have 7-zip then you should :). Install it (and uninstall winrar, winzip etc once confident).
    • copy 7z.exe, 7z.dll and License.txt from in the ./bin directory
    • cd to the top level of the directory then :
    python bin
    

    The GTK user interface will open

    python bin/tk.py
    

    The tkinter user interface will open. Please note I work first on the GTK ui for now, (2020/03/01)
    so everything wont work as it should with tkinter.

    add Mame installations

    • click the add button under the Mame releases area and browse to your Mame64.exe runtime,
    • the guess release button should populate the name and version field (Version field is important you should let it as is)
    • click ok : the Mame release is added. in the Romset folders view, the roms folder(s) defined in mame.ini should appear.
    • the ‘M’ icon means the corresponding folder is used by the currently selected Mame release. Try to add another Mame release to get it.
    • one can add additional romset folders which are not used by any Mame installation
    • name and/or path MUST be different for Mame and folders, no duplicates.

    list romsets

    • click on a romset folder to see what it contains
    • in the romsets view, click on a romset to populate some information. This makes use of the 7z.exe and dll files.
    • the update button refresh the romset list if needed.
    • the verify button test the romset with the currently selected Mame release.
    • the verify all button test all the romsets of the current folder with the currently selected Mame release. this is multithreaded but this is uncompiled python code : is takes around 25 seconds for 800 romsets on a i7.
    • use the save button to save the informations gathered.

    run

    • a romset will be ok if the driver is reported as ‘good’ in the romset view/driver column (but this need a couple more tests to be sure [bios tests, split romset etc…])
    • try the ‘Run with Mame xxx’ button

    API

    Actually the core code is apart from the interface so on could script operations or integrate in another python project.

    to run and play from a python console :

    python -i bin/mameromcheck.py
    

    the ui’s make use of the methods listed below, so can you.

    Mame.list()         # list your Mame Releases (ordered as in the conf.default.tab file and the ui)
    Romdir.list()       # list your romset folders (ordered as in the conf.default.tab file and the ui)
    m = Mame.get(0)     # get the first Mame installation you defined. Mame.get(name) also work.
    m2 = Mame("C:\\ ... \\mame64.exe")  # create a new mame installation
    m2.name = 'my Mame'                 # add a name if you want to save it later
    
    m.run()             # run Mame
    rd = Romdir.get(1)  # get the second romset folder you defined. with name also.
    rd.romset.keys()    # romsets names in this folder
    rd.populate()       # update the romset of this folder
    rd.verify(0)        # silently run a -listxml Mame command on 
    r = rd.romset['romsetname']  # get a romset
    r.verify(0)         # verify it with the first Mame installation
    m.activate()        # romsets will return verification results of the first Mame release ( since m = Mame.get(0) )
    r.driver            # if 'good' is returned, then this should be ok for this release
    
    r.verify(1)            # verify it with the second Mame installation
    Mame.get(1).activate() # romsets will return verification results of the second installation
    r.driver               # so this could be a different result than previously
    r.run(0)               # run the romset with the first Mame release
    r.description
    r.roms              # dictionnary with rom information (crc)
    ...
    
    task.info()     # infos about parrallel threads and current tasks
    task.maxtasks   # max number of parrallel threads. used by ROmdir.verify(), default 5, use with caution (10 means 40% cpu on a i7 8gen. and is ok for me)
    task.verbose    # True|False
    ...
    
    cfg.save()      # save everything in conf/default.tab. file is human readable
    
    [! WIP WIP WIP !]

    Visit original content creator repository
    https://github.com/spamandeggs/MameRomCheck

  • CodeViewer

    Code Viewer Web App

    DEMO:

    This application is deployed on Heroku. Please check it out 😄 here.

    😁 A much improved V2 is on the way 🎉

    Description

    This is a ReactJS based online code sharing application. I have built this by following codersgyan video on it. Feel free to subscribe to him.

    Getting Started with Create React App

    This project was bootstrapped with Create React App.

    Available Scripts

    In the project directory, you can run:

    npm start

    Runs the app in the development mode.
    Open http://localhost:3000 to view it in your browser.

    The page will reload when you make changes.
    You may also see any lint errors in the console.

    npm test

    Launches the test runner in the interactive watch mode.
    See the section about running tests for more information.

    npm run build

    Builds the app for production to the build folder.
    It correctly bundles React in production mode and optimizes the build for the best performance.

    The build is minified and the filenames include the hashes.
    Your app is ready to be deployed!

    See the section about deployment for more information.

    npm run eject

    Note: this is a one-way operation. Once you eject, you can’t go back!

    If you aren’t satisfied with the build tool and configuration choices, you can eject at any time. This command will remove the single build dependency from your project.

    Instead, it will copy all the configuration files and the transitive dependencies (webpack, Babel, ESLint, etc) right into your project so you have full control over them. All of the commands except eject will still work, but they will point to the copied scripts so you can tweak them. At this point you’re on your own.

    You don’t have to ever use eject. The curated feature set is suitable for small and middle deployments, and you shouldn’t feel obligated to use this feature. However we understand that this tool wouldn’t be useful if you couldn’t customize it when you are ready for it.

    Learn More

    You can learn more in the Create React App documentation.

    To learn React, check out the React documentation.

    Code Splitting

    This section has moved here: https://facebook.github.io/create-react-app/docs/code-splitting

    Analyzing the Bundle Size

    This section has moved here: https://facebook.github.io/create-react-app/docs/analyzing-the-bundle-size

    Making a Progressive Web App

    This section has moved here: https://facebook.github.io/create-react-app/docs/making-a-progressive-web-app

    Advanced Configuration

    This section has moved here: https://facebook.github.io/create-react-app/docs/advanced-configuration

    Deployment

    This section has moved here: https://facebook.github.io/create-react-app/docs/deployment

    npm run build fails to minify

    This section has moved here: https://facebook.github.io/create-react-app/docs/troubleshooting#npm-run-build-fails-to-minify

    Visit original content creator repository https://github.com/aayushjha5/CodeViewer
  • filediver

    Filediver

    GitHub Actions Workflow Status GitHub License

    GitHub Release GitHub Downloads (all assets, all releases)

    An unofficial Helldivers 2 game asset extractor.

    Download

    Filediver GUI (graphical interface with preview)

    GUI Screenshot

    Simply download and run. It’s highly recommended to install all extensions when prompted.

    Manually installing extensions

    Do this if auto-download doesn’t work for some reason. BE WARNED THAT IT’S A LOT MORE INVOLVED.

    • In file expolorer, paste %LOCALAPPDATA%\filediver into the directory bar to open the extension folder; all future instructions saying to “create a file/folder” will imply to do it in there
    • Make sure to have file extensions enabled in file explorer
    • Make two folders, called ffmpeg and filediver-scripts
    • FFmpeg
    • Helper scripts
      • Download scripts_dist
      • Place the hd2_accurate_blender_importer folder in scripts-dist-windows.zip/scripts_dist into the filediver-scripts directory you just created
      • Create a new text file called filediver-scripts_version (NO EXTENSION). Edit the file with notepad, type in the latest version of filediver (e.g. v0.6.15) and hit save.

    Filediver CLI (command-line interface)

    Extract the archive. This will create a folder named filediver, where everything relevant is located.

    The program is called “filediver.exe” (or just “filediver” on Linux). See usage.

    Helper scripts (scripts_dist)

    CLI Only: Extract the helper scripts achive into the filediver folder (the same folder containing the executable, e.g. filediver.exe).

    Export features

    • Video to bink/mp4
    • Audio to ogg/aac/wav
    • Images/textures to png
    • 3D models to gltf/blender (with bones, textures and animations [needs flag])
    • Prefabs
    • Text tables to JSON
    • …and more

    Usage

    See the Wiki

    Links

    Credits

    This app builds on a lot of work from other people. This includes:

    Hacking

    Running

    • go run ./cmd/filediver-cli / go run ./cmd/filediver-gui

    Setup blender importer for development

    • uv venv --python 3.11
    • uv pip install -r scripts/requirements.txt
    • set env FILEDIVER_BLENDER_IMPORTER_COMMAND="uv run scripts/hd2_accurate_blender_importer.py"

    License

    Copyright (c) filediver contributors

    FileDiver is licensed under the 3-Clause BSD License (https://opensource.org/license/bsd-3-clause).

    Visit original content creator repository https://github.com/xypwn/filediver
  • homebrew-chunkwm

    homebrew-chunkwm

    Homebrew Tap for Chunkwm tiling window manager (https://github.com/koekeishiya/chunkwm)

    NOTE: plugins folder has been moved to /usr/local/opt/chunkwm/share/chunkwm/plugins

    Table of contents

    1. Supported OSX versions
    2. Brew Options
    3. Caveats
    4. Usage examples
    5. Plugins

    Supported OSX versions

    Chunkwm works with MacOSX >= 10.11

    Brew options

    --with-logging
    	Redirect stdout and stderr to log files to standard brew path.
    --with-purify
        Build purify plugin.
    --with-tmp-logging
    	Redirect stdout and stderr to /tmp.
    --without-border
    	Do not build border plugin.
    --without-ffm
    	Do not build focus-follow-mouse plugin.
    --without-tiling
    	Do not build tiling plugin.
    --HEAD
    	Install HEAD version
    

    Caveats

    Copy the example configuration into your home directory:

    cp /usr/local/opt/chunkwm/share/chunkwm/examples/chunkwmrc ~/.chunkwmrc
    

    Opening chunkwm will prompt for Accessibility API permissions. After access
    has been granted, the application must be restarted:

    brew services restart chunkwm
    

    If both --with-logging and --with-tmp-logging are specified, the former takes
    precedence over the latter.

    Codesign chunkwm binary

    Accessibility API must be granted after every update to chunkwm, unless you codesign the
    binary with self-signed certificate before restarting

    Create code signing certificate named “chunkwm-cert” using Keychain Access.app:

    • Open Keychain Access.app
    • From menu select Keychain Access -> Certificate Assistant -> Create a certificate
    • Fill the certificate form:
      • Name: chunkwm-cert
      • Identity Type: Self Signed Root
      • Certificate Type: Code Signing

    Sign the binary:

    codesign -fs "chunkwm-cert" /usr/local/opt/chunkwm/bin/chunkwm
    

    To have launchd start crisidev/chunkwm/chunkwm now and restart at login:

    brew services start crisidev/chunkwm/chunkwm
    

    Or, if you don’t want/need a background service you can just run:

    chunkwm
    

    Logging

    If the formula has been built with --with-logging, logs will be found in

    /usr/local/var/log/chunwm/chunkwm.[out|err].log
    

    Usage examples

    Clone tap

    brew tap crisidev/homebrew-chunkwm
    

    Install latest stable version

    brew install chunkwm
    

    Install from git repo

    brew install --HEAD chunkwm
    

    Do not install border, tiling, and ffm plugins

    brew install --without-border --without-tiling --without-ffm chunkwm
    

    Log chunkwm stdout and stderr on /tmp

    brew install --with-tmp-logging chunkwm
    

    Plugins

    In the repo I am also distributing other chunkwm plugins.

    Blur wallpaper when there are open windows.

    brew install --HEAD chunkwm-blur
    

    Visit original content creator repository
    https://github.com/crisidev/homebrew-chunkwm

  • timeseries-generator

    timeseries-generator

    This repository consists of a python packages that generates synthetic time series dataset in a generic way (under /timeseries_generator) and demo notebooks on how to generate synthetic timeseries data (under /examples). The goal here is to have non-sensitive data available to demo solutions and test the effectiveness of those solutions and/or algorithms. In order to test your algorithm, you want to have time series available containing different kinds of trends. The python package should help create different kinds of time series while still being maintainable.

    timeseries_generator package

    For this package, it is assumed that a time series is composed of a base value multiplied by many factors.

    ts = base_value * factor1 * factor2 * ... * factorN + Noiser
    

    Diagram

    These factors can be anything, random noise, linear trends, to seasonality. The factors can affect different features. For example, some features in your time series may have a seasonal component, while others do not.

    Different factors are represented in different classes, which inherit from the BaseFactor class. Factor classes are input for the Generator class, which creates a dataframe containing the features, base value, all the different factors working on the base value and and the final factor and value.

    Core concept

    • Generator: a python class to generate the time series. A generator contains a list of factors and noiser. By overlaying the factors and noiser, generator can produce a customized time series
    • Factor: a python class to generate the trend, seasonality, holiday factors, etc. Factors take effect by multiplying on the base value of the generator.
    • Noised: a python class to generate time series noise data. Noiser take effect by summing on top of “factorized” time series. This formula describes the concepts we talk above

    Built-in Factors

    • LinearTrend: give a linear trend based on the input slope and intercept
    • CountryYearlyTrend: give a yearly-based market cap factor based on the GDP per – capita.
    • EUEcoTrendComponents: give a monthly changed factor based on EU industry product public data
    • HolidayTrendComponents: simulate the holiday sale peak. It adapts the holiday days – differently in different country
    • BlackFridaySaleComponents: simulate the BlackFriday sale event
    • WeekendTrendComponents: more sales at weekends than on weekdays
    • FeatureRandFactorComponents: set up different sale amount for different stores and different product
    • ProductSeasonTrendComponents: simulate season-sensitive product sales. In this example code, we have 3 different types of product:
      • winter jacket: inverse-proportional to the temperature, more sales in winter
      • basketball top: proportional to the temperature, more sales in summer
      • Yoga Mat: temperature insensitive

    Installation

    pip install timeseries-generator

    Usage

    from timeseries_generator import LinearTrend, Generator, WhiteNoise, RandomFeatureFactor
    import pandas as pd
    
    # setting up a linear tren
    lt = LinearTrend(coef=2.0, offset=1., col_name="my_linear_trend")
    g = Generator(factors={lt}, features=None, date_range=pd.date_range(start="01-01-2020", end="01-20-2020"))
    g.generate()
    g.plot()
    
    # update by adding some white noise to the generator
    wn = WhiteNoise(stdev_factor=0.05)
    g.update_factor(wn)
    g.generate()
    g.plot()

    Example Notebooks

    We currently have 2 example notebooks available:

    1. generate_stationary_process: Good for introducing the basics of the timeseries_generator. Shows how to apply simple linear trends and how to introduce features and labels, as well as random noise.
    2. use_external_factors: Goes more into detail and shows how to use the external_factors submodule. Shows how to create seasonal trends.

    Web based prototyping UI

    We also use Streamlit to build a web-based UI to demonstrate how to use this package to generate synthesis time series data in an interactive web UI.

    streamlit run examples/streamlit/app.py

    Web UI

    License

    This package is released under the Apache License, Version 2.0

    Visit original content creator repository https://github.com/Nike-Inc/timeseries-generator
  • BharatLeafLens

    Bharat-Leaf-Lens Project Image

    Introducing Bharat Leaf Lens an innovative app designed to aid in the identification of medicinal plants across India. Leveraging the power of deep learning our app provides users with a reliable tool to discern different plant species based on images. Our model is trained on an open-source dataset ensuring transparency and accessibility. The dataset available under the Creative Commons BY-NC-SA 4.0 license empowers users to not only utilize the app but also contribute to its improvement. We adhere strictly to the license terms respecting the principles of attribution non-commercial use and share-alike. At Bharat Leaf Lens we prioritize user privacy. Rest assured no images of users are stored in our database guaranteeing confidentiality and peace of mind. Experience the convenience and accuracy of Bharat Leaf Lens as you explore the rich diversity of medicinal plants in India. Download now and embark on a journey of discovery and wellness.

    🚀 Demo

    https://github.com/aintyourcupoftea/BharatLeafLens/releases

    Project Screenshots:

    project-screenshot

    project-screenshot

    project-screenshot

    🧐 Features

    Here’re some of the project’s best features:

    • Image Pre-processing
    • Plant Detection
    • Plant Classification

    🛠️ Installation Steps:

    1. Clone Github Repository

    git clone https://github.com/aintyourcupoftea/BharatLeafLens.git
    

    2. Open Project Directory

    cd BharatLeafLens
    

    3. Clean Build Directory

    flutter clean
    

    4. Build APK

    flutter build apk
    

    🍰 Contribution Guidelines:

    All meaningful contributions are welcome! 🤗

    💻 Built with

    Technologies used in the project:

    • Flutter
    • PyTorch
    • Python
    • Tensorflow

    💖Like my work?

    Please give a Star 🌟 if you like this project!

    Visit original content creator repository https://github.com/aintyourcupoftea/BharatLeafLens
  • handsontable-demos

    Handsontable for Charts

    Handsontable integration with different data charts.

    Table of contents

    1. Installation
    2. Building
    3. Basic usage
    4. Examples
    5. License
    6. Contact

    Installation

    git clone https://github.com/pnowak/handsontable-demos
    cd handsontable-demos
    npm install
    

    Building

    If you used npm to download the library, you should be good to go, but if you want to make a build yourself, go to the directory where handsontable-demos source is located and run:

    npm run build
    

    This will create a /dist/bundle.js for you to use.

    Basic usage

    // import HighChartsWrapper...
    import HighChartsWrapper from './charts/highChartsWrapper';
    
    // ... and Handsontable
    import Handsontable from 'handsontable';
    
    const chartsWrapper = [];
    
    const hot = new Handsontable(document.getElementById('root'), {
      data: [
        [29.9, 71.5, 106.4, 129.2, 144.0, 176.0, 135.6, 148.5, 216.4, 194.1, 95.6, 54.4],
      ],
      colHeaders: ['Jan', 'Feb', 'Mar', 'Apr', 'May', 'Jun', 'Jul', 'Aug', 'Sep', 'Oct', 'Nov', 'Dec'],
      rowHeaders: true,
      type: 'numeric',
      allowInvalid: false,
      afterInit: function afterInit() {
        chartsWrapper.push(new HighChartsWrapper('highcharts', this));
      },
    });
    
    hot.addHook('beforeChange', (changes) => {
      changes.forEach((change) => {
        chartsWrapper.forEach((chart) => {
          const [, column, , currentValue] = change;
    
          chart.updateChartData(column, currentValue);
        });
      });
    });

    Examples

    License

    handsontable-demos is released under the MIT license.
    All trademarks and copyrights belong to their respective owners.

    Contact

    Feel free to give us feedback on this wrapper using this contact form or write directly at hello@handsontable.com.

    Visit original content creator repository
    https://github.com/pnowak/handsontable-demos

  • pyespargos

    ESPARGOS Python Client Library + Demos

    pyespargos is the python library for working with the ESPARGOS WiFi channel sounder. ESPARGOS is a real-time-capable, phase-synchronous 2 × 4 WiFi antenna array built from Espressif ESP32 chips that facilities that development and deployment of WiFi sensing applications.

    pyespargos is still under development. Currently, only HT40 packets (40MHz wide channels) are supported.

    Demo Applications

    MUSIC Spatial spectrum Receive Signal Phase by Antenna
    Instantaneous CSI: Frequency Domain Instantaneous CSI: Time Domain
    Phases over Time Combined 8 × 4 ESPARGOS Array

    pyespargos comes with a selection of demo applications for testing ESPARGOS. The following demos are provided in the demos folder of this repository:

    • music-spectrum: Use the MUSIC algorithm to display a spatial (angular) spectrum. Demonstrates angle of arrival (AoA) estimation.
    • phases-over-space: Show the average received phase for each ESPARGOS antenna.
    • instantaneous-csi: Plot the current frequency-domain or time-domain transfer function of the measured channel.
    • phases-over-time: Plot the average received phase for every antenna over time.
    • combined-array: Combine multiple ESPARGOS arrays into one large antenna array and visualize the average received phase for each antenna. Requires multiple ESPARGOS arrays.

    Unless otherwise noted, the demos connect to exactly one ESPARGOS antenna array with 2 × 4 antennas.

    Installation

    • Create a virtual environment for pyespargos
    python -m venv ~/pyespargos-venv
    • Activate the virtual environment. You will need to execute this every time before running any pyespargos-based scripts:
    . ~/pyespargos-venv/bin/activate
    • Install pyespargos to the new virtual environment with pip:
    cd pyespargos
    pip install .
    • If you want to make changes to pyespargos, it is recommended to install it in editable mode. This way, if you make changes to the espargos library, they are immediately applied without needing to re-install anything:
    sudo pip install -e .
    • If you want to run the demo applications, you will need to install some additional Python dependencies:
    pip install pyqt6 pyqt6-charts
    
    • Import the espargos package in your Python application. Use this minimal sample code to get started:
    #!/usr/bin/env python3
    
    import espargos
    import time
    
    pool = espargos.Pool([espargos.Board("192.168.1.2")])
    pool.start()
    pool.calibrate(duration = 2)
    backlog = espargos.CSIBacklog(pool, size = 20)
    backlog.start()
    
    # Wait for a while to collect some WiFi packets to the backlog...
    time.sleep(4)
    
    csi_ht40 = backlog.get_ht40()
    print("Received CSI: ", csi_ht40)
    
    backlog.stop()
    pool.stop()
    • Take a look at the demo applications for advanced usage
    • To run the demos that come with pyespargos, you may need to install additional dependencies that are not listed in requirements.txt (most notably, PyQt6-related packages)

    Basics

    WiFi

    • ESPARGOS uses the L-LTF and/or HT-LTF fields of 802.11g/n frames to extract channel state information (CSI).
    • ESPARGOS is totally passive, it only acts as a receiver in promiscuous mode. It provides CSI for any WiFi frames it receives.
    • To receive frames, the transmitter and ESPARGOS must use the same WiFi channel.
    • 802.11n supports channel bandwidths of 20MHz and 40MHz. The ESPARGOS hardware and firmware supports both bandwidth configurations, but pyespargos currently only works with frames which use 40MHz of bandwidth (known as “HT40”).

    Communication between pyespargos and ESPARGOS

    • ESPARGOS provides an HTTP / WebSockets API on port 80.
    • CSI is streamed in binary format over a WebSocket.
    • Control commands are issued via HTTP.

    The Backlog

    • The L-LFT and HT-LTF fields used for channel estimation are really short compared to the total length of the WiFi frame.
    • This results in really noisy CSI estimates.
    • Therefore, it is a good idea to average CSI over multiple WiFi packets.
    • To this end, pyespargos offers a backlog functionality, where CSI from the last N packets is cached. The backlog is implemented as a ringbuffer.
    • To obtain higher-quality CSI, you may use the CSI interpolation helpers in espargos/util.py.

    Calibration

    • ESPARGOS is based on phase-synchronized ESP32 SoCs. Phase synchronization is achieved in two steps:

      • All ESP32 chips are clocked from the same 40MHz reference clock, which makes them frequency-synchronous.
      • To correct for PLL phase ambiguity a WiFi frames is distributed to all ESP32 chips over a known channel (microstrip traces of known length on the PCB).
    • Now we know the initial phase of the local oscillator (LO) signal on every ESP32.

    • With pyespargos, this calibration can be performed with just one command: pool.calibrate()

    • In our observations, this initial phase offset between antennas remains relatively static over time, so one calibration of ESPARGOS should be sufficient.

    • Additionally, we we can obtain very precise packet reception timestamps, which provides time synchronization.

    Additional Non-Public Demo Applications

    • dataset-recorder: Application to record ESPARGOS datasets for publication on https://espargos.net/datasets/. Please contact me to get access.
    • realtime-localization: Real-time Localization Demo: Channel Charting vs. Triangulation vs. Supervised Training. Requires multiple ESPARGOS. Please contact me to get access.

    License

    pyespargos is licensed under the GNU Lesser General Public License version 3 (LGPLv3), see LICENSE for details.

    Visit original content creator repository https://github.com/ESPARGOS/pyespargos