


- references
- https://github.com/optics-dev/Monocle
- https://www.optics.dev/Monocle/
- https://www.baeldung.com/scala/monocle-optics
- https://github.com/optics-dev/Monocle/tree/master/example/src/test/scala-2/monocle/function
- Monocle 3: A Peek into the Future by Julien Truffaut: Scala in the City Conference
- Lenses, Prisms and Optics in Scala | Rock the JVM
- https://blog.rockthejvm.com/lens/
- Scale By The Bay 2020: Julien Truffaut, Monocle 3: a peek into the future
- https://medium.com/javascript-scene/lenses-b85976cb0534
- Mastering Optics in Scala with Monocle. Shimi Bandiel. ScalaUA2017
- Optics with Monocle – Modeling the Part and the Whole
- Data Juggling – Part 2 – Homegrown #Lenses (#Monocle – Part 1)
- Data Juggling – Part 3 – Optics Explained (#Monocle – Part 2)
- Data Juggling – Part 4 – #Quicklens (#Monocle – Part 3)
- https://github.com/softwaremill/quicklens
- https://www.warski.org/blog/2015/02/quicklens-modify-deeply-nested-case-class-fields/
- https://github.com/DevInsideYou/monocle-vs-quicklens
- https://kubuszok.com/2018/adt-through-the-looking-glass/
- https://www.scala-exercises.org/monocle
- https://medium.com/zyseme-technology/functional-references-lens-and-other-optics-in-scala-e5f7e2fdafe
- https://circe.github.io/circe/optics.html
- https://scalac.io/blog/scala-optics-lenses-with-monocle/
- https://dzone.com/articles/focus-on-your-data-structures-with-scala-lenses
- https://github.com/falvarezb/blog-bytecode/blob/postLenses/src/test/scala/fjab/LensesTest.scala
- https://circe.github.io/circe/optics.html
- https://github.com/softwaremill/quicklens
- goals of this workshop
- introduction to theoretical basis of optics
- practice monocle and quicklens libraries
- workshop plan
- provide implementation of
lib.Lensand then use it inVanillaOpticsSpec- hint: use
lib.Getterandlib.Setter
- hint: use
- implement tests in
OpticsSpecaccording to its names
- provide implementation of
- problem: updating nested immutable objects
- example
sealed trait PaymentMethod object { case class PayPal(emai: String) extends PaymentMethod case class DebitCard( cardNumber: String, expirationDate: YearMonth, securityCode: Int ) extends PaymentMethod } case class User(name: String, address: Address, paymentMethod: PaymentMethod) case class Address(streetNumber: Int, postCode: String) val michal = User("michal", Address(12, "E16 4SR"), PaymentMethod.PayPal("a@gmail.com")) - updates of mutable objects (assume that above we have fields defined as
vars)michal.address.streetNumber = 16 - updated of immutable objects
- using copy
michal.copy(address = michal.address.copy(streetNumber = 16) - but how we will update enum?
def updateExpiry(user: User, newExpiry: YearMonth): User = user.copy(paymentMethod = user.paymentMethod match { case card: DebitCard => card.copy(expirationDate = newExpiry) case paypal: PayPal => paypal } - or suppose we have
paymentMethods: Map[String, PaymentMethod]instead of singlepaymentMethod: PaymentMethodval michal = User( "michal", Address(12, "E16 4SR"), Map( "Personal" -> PayPal("mtu@gmail.com"), "Business" -> DebitCard("", YearMonth.of(2022, 7), 995) ) ) def updateExpiry(user: User, paymentName: String, newExpiry: YearMonth): User = user.copy(paymentMethod = user.paymentMethods.get(paymentName) match { case None | Some(_: PayPal) => user.paymentMethods case Some(card: DebitCard) => val updatedCard = card.copy(expirationDate = newExpiry) user.paymentMethods.updated(paymentName, updatedCard) }
- using copy
- example
- it would be nice if we could have something like OOP’s setters for immutable data structures
.copyis like that, but it doesn’t compose- lenses can be considered the functional representations of getters and setters
and usage
case class Lens[A, B](get: A => B, set: (B, A) => A)val articleTitleLens = Lens[Article, String](get = _.title, set = (t, a) => a.copy(title = t)) - note that this boilerplate could be generated by macros
- working with deeply nested JSON
- example
import io.circe._, io.circe.parser._ val json: Json = parse(""" { "order": { "customer": { "name": "Custy McCustomer", "contactDetails": { "address": "1 Fake Street, London, England", "phone": "0123-456-789" } }, "items": [{ "id": 123, "description": "banana", "quantity": 1 }, { "id": 456, "description": "apple", "quantity": 2 }], "total": 123.45 } } """).getOrElse(Json.Null) - migrate one JSON format into the other without having to decode into the ADT
import io.circe.optics.JsonPath._ val _phoneNum = root.order.customer.contactDetails.phone.string // _phoneNum: monocle.package.Optional[Json, String] = monocle.POptional$$anon$1@367b3ec4 val phoneNum: Option[String] = _phoneNum.getOption(json) - receive events/requests in the older format, check version, run all migrations to the current one
- keep case classes and case objects only for the current schema
- modifying json
val doubleQuantities: Json => Json = root.order.items.each.quantity.int.modify(_ * 2)
- example
- working with property based testing
- introduction to property based testing: https://github.com/mtumilowicz/scala-zio2-test-aspects-property-based-testing-workshop
- it is often easier to generate general complex object and then in test just change some fields according to needs
- example
val genAccount: Gen[Any, Account] = DeriveGen[Account]

test("create locked account test") {
  check(genAccount) { account =>
    val lockedAccount = account.modify(_.details.alerting.locked).setTo(false)
    assertZIO(AccountService.createAccount(lockedAccount))(equalTo(AccountCreated(account.id)))
  }
}
A lens is a first-class reference to a subpart of some data type
School of Haskell
any data accessor for a component of a data structure is ‘function-like’, in the sense that reading ‘consumes’ the component from the data structure and writing ‘produces’ an updated component to put back into the data structure. The type structure of such function-like things — henceforth transformers — is technically known as a profunctor.
Profunctor Optics Modular Data Accessors
- problem: how to implement Lens for a sum type?
- with current implementation: impossible
- there is no way to define getter
- solution: partial lens (prism/optional in monocle)
case class PartialLens[A, B](get: A => Option[B], set: (B, A) => Option[A])
- with current implementation: impossible
- polymorphic lenses
- lens construct focuses on a single field
- what if we have multiple fields?
- example: setting all the values in certain fields of a json
- with current implementation: impossible
- solution: val Laarhoven representation
- we want to unify all functions
get: S => A set: A => S => S modify: (A => A) => (S => S) modifyMaybe: (A => Option[A]) => (S => Option[S]) modifyList: (A => List[A]) => (S => List[S]) - generic representation the can support all features in the same type
[F: Functor[_], S, T, A, B] // F ~ for example: Option, Collection
modifyF: (f: A => F[B]): S => F[T]
- we want to unify all functions
- when Optic is polymorphic additional two types come into play for “reverse” operation
- example
trait PLens[S, T, A, B] { def get(s: S): A def set(b: B)(s: S): T } Bfor an argument andTfor a result of that operation
- example
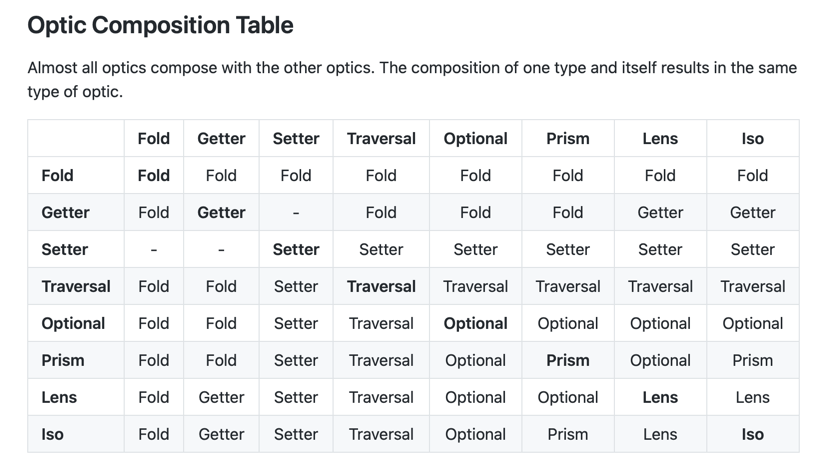
Traversalis more generic thanOptional- it composes with everything that
Optionalcomposes - it makes sense for all optics to have 4 type parameters (for S => T and A => B mappings)
- this way we can always compose them
- it composes with everything that
- laws
- identity: if you get and then set back with the same value, the object remains identical
lens.set(s, lens.get(s)) == s - retention: if you set with a value and then perform a get, you get the same value back
lens.get(lens.set(s, a)) == a - double set — if you set twice in succession and then perform a get, you get back the last set value
lens.get(lens.set(lens.set(s, a), b)) == b - example of breaking a law
michal.focus(_.paymentMethods
    .*
    .as[DebitCard]
    .filter(_.expirationDate.isAfter(YearMonth.of(2020, 5))) // breaks the contract
    .expirationDate
    ).get

val optic = Focus[User](_.paymentMethods
    .*
    .as[DebitCard]
    .filter(_.expirationDate.isAfter(YearMonth.of(2020, 5))) // breaks the contract
    .expirationDate

val updated1 = optic.modify(michal, _.minusYears(2))
val updated2 = optic.modify(update1, _.plusMonths(3)) // not works
val updated3 = optic.modify(michal, _.minusYears(2).plusMonths(3)) // not the same result as updated1 + updated2
- identity: if you get and then set back with the same value, the object remains identical
- based on Monocle
ISO[S, A]- converts elements of type
Sinto elements of typeAwithout loss - isomorphism between two types (bijection)
- example
- case class <-> tupleN
case class Person(name: String, age: Int)- is equivalent to a tuple
(String, Int) - tuple
(String, Int)is equivalent toPerson
- is equivalent to a tuple
- collections: List <-> Vector
- case class <-> tupleN
- convenient to lift methods from one type to another
- example: a
Stringcan be seen as aList[Char]
- example: a
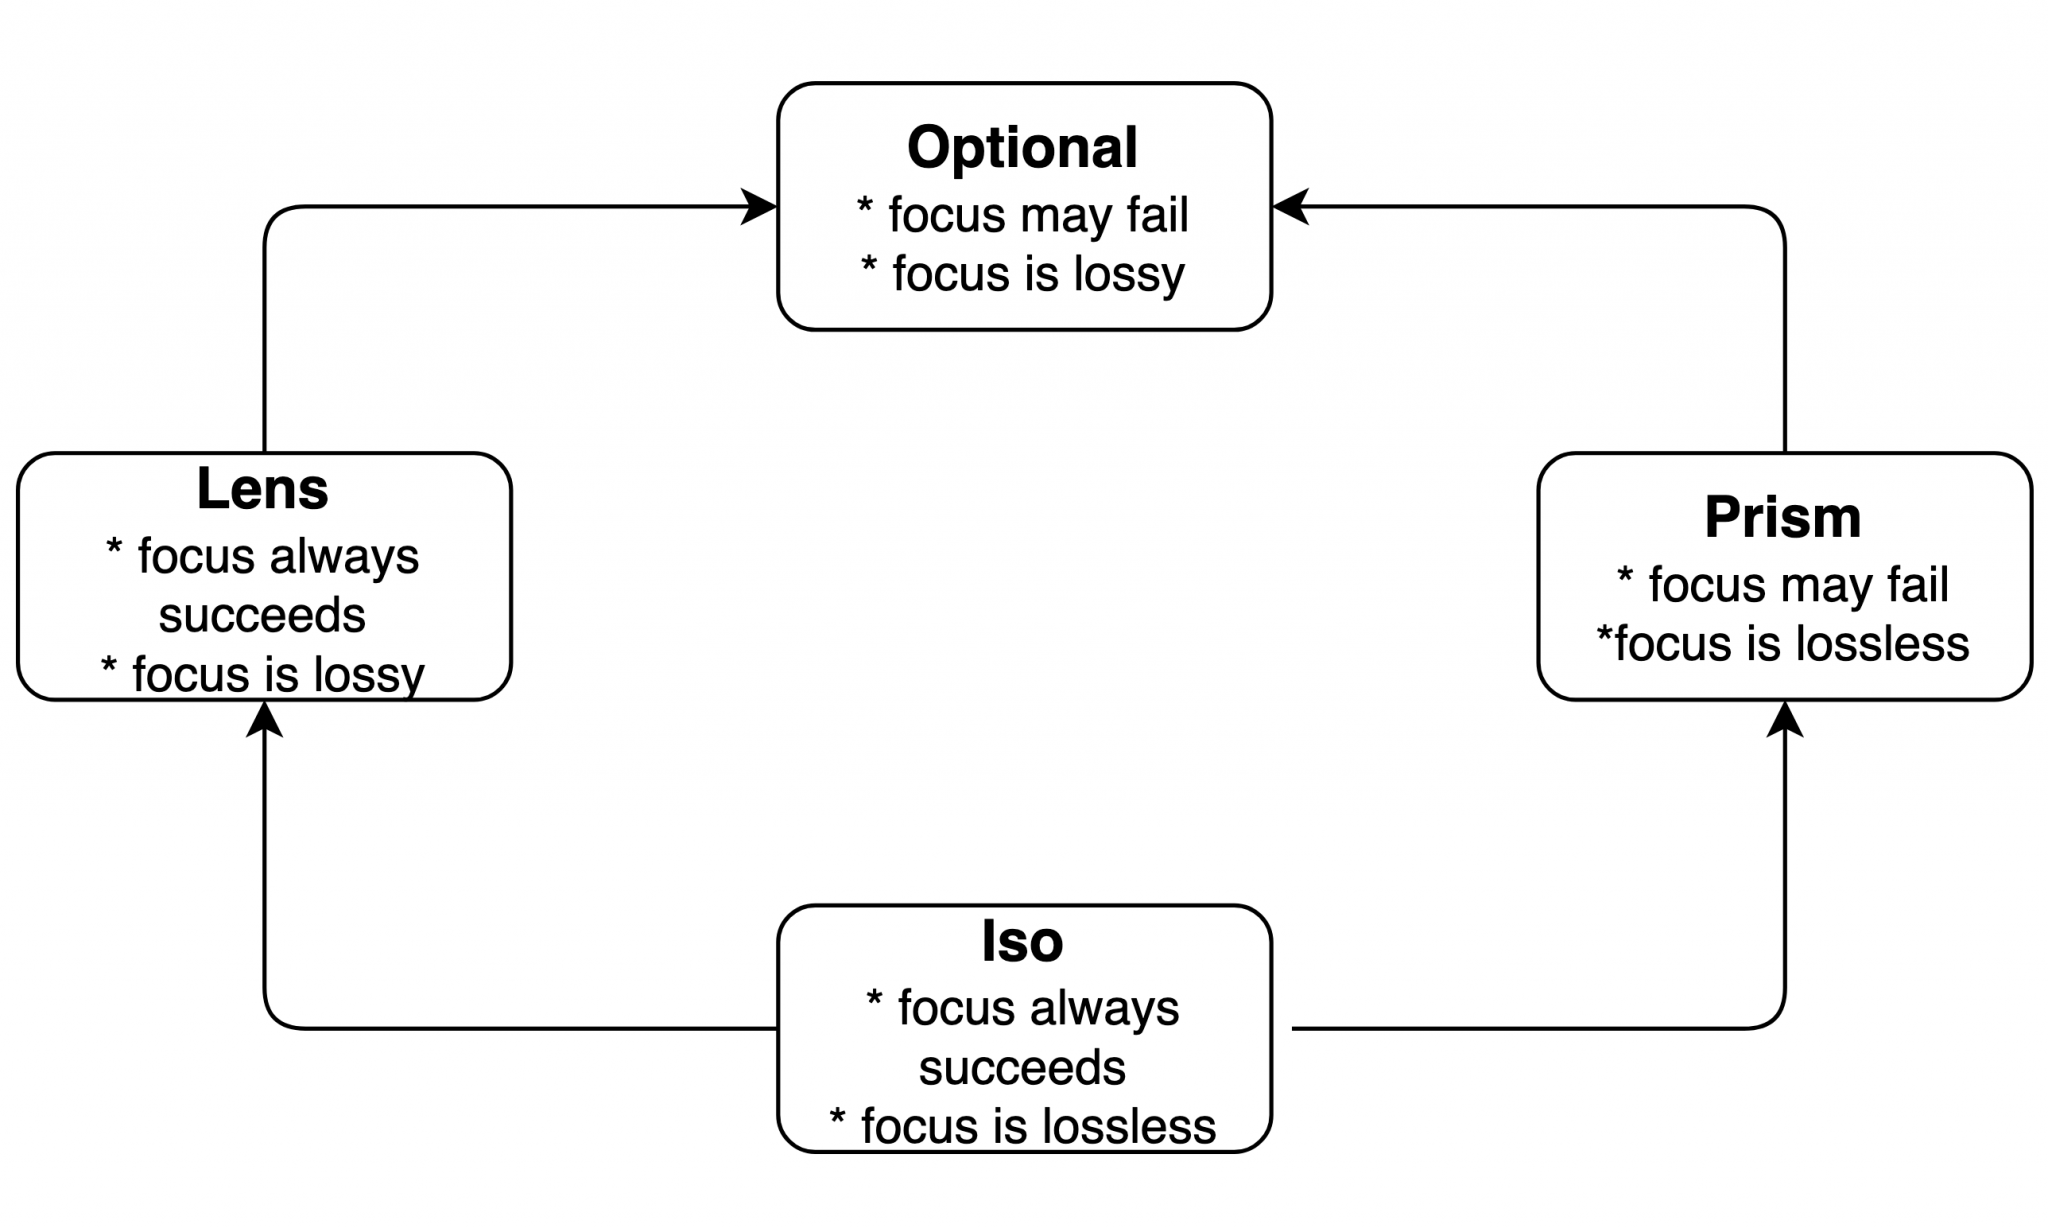
- you can think of Iso as something that is simultaneously Lens and Prism
- Lens: navigating from
StoAis always successful - Prism: navigating from
AtoSdoes not need any additional information besides of A value - in other words: transformation from S to A is lossless
- Lens: navigating from
- when is useful?
- anytime when representing essentially the same data in different ways
- example: physical units
case class Meter(whole: Int, fraction: Int)
case class Centimeter(whole: Int)

val centimeterToMeterIso = Iso[Centimeter, Meter] { cm =>
  Meter(cm.whole / 100, cm.whole % 100)
}{ m =>
  Centimeter(m.whole * 100 + m.fraction)
}

centimeterToMeterIso.modify(m => m.copy(m.whole + 3))(Centimeter(155))
- converts elements of type
Prism[S, A]- used for
- sum type (coproduct)
- example: sealed trait or Enum
- when there is no 1-1 correspondence
- example
- String – Int
- not all strings are transformable to Int, all Int transformable to String
String<-IntString->Option[Int]
- digression
- notice that
"0003".toInt == 3but it is not reversible- you have to put more constraint on String to have that example represents Prism
- notice that
- not all strings are transformable to Int, all Int transformable to String
- String – Int
- example
- sum type (coproduct)
- laws
- if there is an answer, going back must give the source
- if we go back, there must be an answer, which is the source
- vs lens
- sometimes fails to get target (Option) but you can always come back
- used for
Optional[S, A]- you may think of
Optionalas something more general than bothPrismandLensPrism: the element A we are trying to focus may not existLens: we don’t have enough information to go back toSwithout additional argument- summary: worst part of lens and prism – can fail to retrieve and can fail to get back
- example
- setup
sealed trait Error case class ErrorA(message: String, details: String) extends Error case object ErrorB extends Error - task:
Optional[Error, String]to “zoom into” details- cannot be
Lens[Error, String]asErrorBdoes not contain details
- cannot be
- solution
val getErrorADetails: Lens[ErrorA, String] = GenLens[ErrorA](_.details)
val getErrorA: Prism[Error, ErrorA] = GenPrism[Error, ErrorA]
val getDetails: Optional[Error, String] = getErrorA andThen getErrorADetails
- setup
- it’s quite rare to see
Optionalimplemented directly- usually: implement Prism and Lens and then compose them together
- you may think of
Traversal[S, A]- like optional that can focus on 0 to n fields
- generalisation of an
Optionalto several targets - example: focus into all elements inside of a container (e.g. List, Vector, Option)
At[S, I, A]- an “index” I, provides a Lens[S, A]
- built-in instances for map and set
- Lens
Index[S, I, A]- like
At - works on an optional index
- built-in: list, map, string etc
- Prism
- can’t delete the value under the key
- like
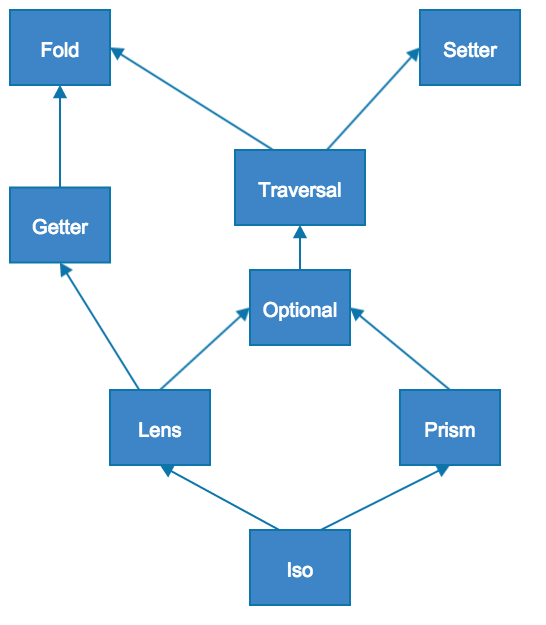
- hierarchy (based on monocle)
- diagram meant to be read as UML class hierarchy diagram
- arrow going from
LenstoOptionalmeans thatLensis a special case ofOptional - what does it mean that both
LensandPrismcan be treated asOptional?Lensis anOptionalfor whichgetOptionalways succeedsPrismis anOptionalfor which we ignoresS(“the whole part”)A(“the specific part”) holds all information to produce newS
- arrow going from
- diagrams


- diagram meant to be read as UML class hierarchy diagram


- composing
val setStreetNumber = GenLens[Address](_.streetNumber) val setAddress = GenLens[User](_.address) val composed = setAddress andThen setStreetNumber composed.replace(newStreetNo)(user) - focus
- https://www.optics.dev/Monocle/docs/focus
- Focus in scala 2 is much more limited. You can only using to generate lenses for fields inside a case class.
- example
person
  .focus(_.address.street.name).modify(_.toUpperCase)
- https://www.optics.dev/Monocle/docs/focus
person
  .modify(_.address.street.name).using(_.toUpperCase)
  .modify(_.age).setTo(22)
  .modify(_.weight).setToIfDefined(Some(100))
  .modify(_.payments.each.result).using(_.toUpperCase)
  .modify(_.props.at("Height").value).setTo(178)
  .modify(_.pets.each.when[Dog].age).using(_ + 1)
 https://github.com/mtumilowicz/scala-optics-monocle-quicklens-workshop