Blog

  • Udacity-DRL-ContinuousControl

    Deep Reinforcement Learning : Continuous Control

    This project repository contains my work for the Udacity’s Deep Reinforcement Learning Nanodegree Project 2: Continuous Control.

    Project’s goal

    In this environment, a double-jointed arm can move to target locations. A reward of +0.1 is provided for each step that the agent’s hand is in the goal location. Thus, the goal of the agent is to maintain its position at the target location for as many time steps as possible.

    In Project 2, train an agent to maintain its position at the target location for as many time steps as possible.

    About Deep Reinforcement Learning

    Reinforcement learning refers to goal-oriented algorithms, which learn how to attain a complex objective (goal) or maximize along a particular dimension over many steps; for example, maximize the points won in a game over many moves. They can start from a blank slate, and under the right conditions they achieve superhuman performance. Like a child incentivized by spankings and candy, these algorithms are penalized when they make the wrong decisions and rewarded when they make the right ones – this is reinforcement.

    In this project I have chosen to use a Policy Based method called DDPG (Deep Deterministics Policy Gradient)

    Environment details

    The environment is based on Unity ML-agents. The project environment provided by Udacity is similar to the Reacher environment on the Unity ML-Agents GitHub page.

    The Unity Machine Learning Agents Toolkit (ML-Agents) is an open-source Unity plugin that enables games and simulations to serve as environments for training intelligent agents. Agents can be trained using reinforcement learning, imitation learning, neuroevolution, or other machine learning methods through a simple-to-use Python API.

    The observation space consists of 33 variables corresponding to position, rotation, velocity, and angular velocities of the arm. Each action is a vector with four numbers, corresponding to torque applicable to two joints. Every entry in the action vector should be a number between -1 and 1.

    • Set-up: Double-jointed arm which can move to target locations.
    • Goal: The agents must move it’s hand to the goal location, and keep it there.
    • Agents: The environment contains 10 agent linked to a single Brain.
      • The provided Udacity agent versions are Single Agent or 20-Agents
    • Agent Reward Function (independent):
      • +0.1 Each step agent’s hand is in goal location.
    • Brains: One Brain with the following observation/action space.
      • Vector Observation space: 26 variables corresponding to position, rotation, velocity, and angular velocities of the two arm Rigidbodies.
      • Vector Action space: (Continuous) Size of 4, corresponding to torque applicable to two joints.
      • Visual Observations: None.
    • Reset Parameters: Two, corresponding to goal size, and goal movement speed.
    • Benchmark Mean Reward: 30

    For this project, Udacity has provided two separate versions of the Unity environment:

    • The first version contains a single agent.
    • The second version contains 20 identical agents, each with its own copy of the environment.

    The second version is useful for algorithms like PPO, A3C, and D4PG that use multiple (non-interacting, parallel) copies of the same agent to distribute the task of gathering experience.

    Solving the Environment

    Depending on the chosen environment for the implementation, there are 2 possibilities:

    • Option 1: Solve the First Version

      • The task is episodic, and in order to solve the environment, the agent must get an average score of +30 over 100 consecutive episodes.
    • Option 2: Solve the Second Version

      • The barrier for solving the second version of the environment is slightly different, to take into account the presence of many agents. In particular, the agents must get an average score of +30 (over 100 consecutive episodes, and over all agents). Specifically:

        • After each episode, the rewards that each agent received (without discounting) are added up , to get a score for each agent. This yields 20 (potentially different) scores. The average of these 20 scores is then used.
        • This yields an average score for each episode (where the average is over all 20 agents).
      • The environment is considered solved, when the average (over 100 episodes) of those average scores is at least +30.

    In my implementation I have chosen to solve the First version of the environment (Single Agent) using the off-policy DDPG algorithm. The task is episodic, and in order to solve the environment, the agent must get an average score of +30 over 100 consecutive episodes.

    Getting started

    Installation requirements

    • You first need to configure a Python 3.6 / PyTorch 0.4.0 environment with the needed requirements as described in the Udacity repository
    • Of course you have to clone this project and have it accessible in your Python environment
    • Then you have to install the Unity environment as described in the Getting Started section (The Unity ML-agant environment is already configured by Udacity)

    Download the environment from one of the links below. You need only select the environment that matches your operating system:

    - **_Version 1: One (1) Agent_**
        - Linux: [click here](https://s3-us-west-1.amazonaws.com/udacity-drlnd/P2/Reacher/one_agent/Reacher_Linux.zip)
        - Mac OSX: [click here](https://s3-us-west-1.amazonaws.com/udacity-drlnd/P2/Reacher/one_agent/Reacher.app.zip)
        - Windows (32-bit): [click here](https://s3-us-west-1.amazonaws.com/udacity-drlnd/P2/Reacher/one_agent/Reacher_Windows_x86.zip)
        - Windows (64-bit): [click here](https://s3-us-west-1.amazonaws.com/udacity-drlnd/P2/Reacher/one_agent/Reacher_Windows_x86_64.zip)
    
    - **_Version 2: Twenty (20) Agents_**
        - Linux: [click here](https://s3-us-west-1.amazonaws.com/udacity-drlnd/P2/Reacher/Reacher_Linux.zip)
        - Mac OSX: [click here](https://s3-us-west-1.amazonaws.com/udacity-drlnd/P2/Reacher/Reacher.app.zip)
        - Windows (32-bit): [click here](https://s3-us-west-1.amazonaws.com/udacity-drlnd/P2/Reacher/Reacher_Windows_x86.zip)
        - Windows (64-bit): [click here](https://s3-us-west-1.amazonaws.com/udacity-drlnd/P2/Reacher/Reacher_Windows_x86_64.zip)
    
    (_For Windows users_) Check out [this link](https://support.microsoft.com/en-us/help/827218/how-to-determine-whether-a-computer-is-running-a-32-bit-version-or-64) if you need help with determining if your computer is running a 32-bit version or 64-bit version of the Windows operating system.
    
    (_For AWS_) If you'd like to train the agent on AWS (and have not [enabled a virtual screen](https://github.com/Unity-Technologies/ml-agents/blob/master/docs/Training-on-Amazon-Web-Service.md)), then please use [this link](https://s3-us-west-1.amazonaws.com/udacity-drlnd/P2/Reacher/one_agent/Reacher_Linux_NoVis.zip) (version 1) or [this link](https://s3-us-west-1.amazonaws.com/udacity-drlnd/P2/Reacher/Reacher_Linux_NoVis.zip) (version 2) to obtain the "headless" version of the environment.  You will **not** be able to watch the agent without enabling a virtual screen, but you will be able to train the agent.  (_To watch the agent, you should follow the instructions to [enable a virtual screen](https://github.com/Unity-Technologies/ml-agents/blob/master/docs/Training-on-Amazon-Web-Service.md), and then download the environment for the **Linux** operating system above._)
    
    • Finally, unzip the environment archive in the ‘project’s environment’ directory and eventually adjust the path to the UnityEnvironment in the code.

    Note: A conda environment file is provided with this project (so you can check/install the versions of the libraries I used)

    Train a agent

    Execute the provided notebook within this Nanodegree Udacity Online Workspace for “project #2 Continuous Control” (or build your own local environment and make necessary adjustements for the path to the UnityEnvironment in the code )

    Note :

    • Manually playing with the environment has not been implemented as it is not available with Udacity Online Worspace (No Virtual Screen)
    • Watching the trained agent playing in the environment has not been implemented neither, as it is not available with Udacity Online Worspace (No Virtual Screen) and not compatible with my personal setup (see Misc : Configuration used section)

    Misc : Configuration used

    This agent has been trained on my “Deep Learning Dev Box”, which is basically a Linux GPU Server, running Docker containers (using Nvidia Docker 2), serving Jupyter Lab notebooks which are accessed remotely via a web interface (or a ssh connection) : unfortunately this setup does not seem suitable to run Unity ML agent, with the GPU and providing a display for for the agent (See Unity documentation for more details). Thus the headless / no visualization version of the Unity environment was used.

    Visit original content creator repository https://github.com/fdasilva59/Udacity-DRL-ContinuousControl
  • rn-skeleton

    rn-skeleton

    Having trouble finding examples for integrating keys frameworks such has redux with saga and navigation on React Native. It is easy to find example on a specific topic but I could never find everything that would work together. I did some adaptation to my style and there are probably other ways, if you like or dislike, feel free to leave comments or suggestions.

    React native skeleton project for:

    • React Native
    • React-Redux
    • Redux-Persist
    • React Navigation
    • Redux-Saga
    • Storybook
    • Jest

    If you are not interested in storybooks, you can use version 0.1

    Application

    Overview

    • Inspired by Spencer Carli tutorial

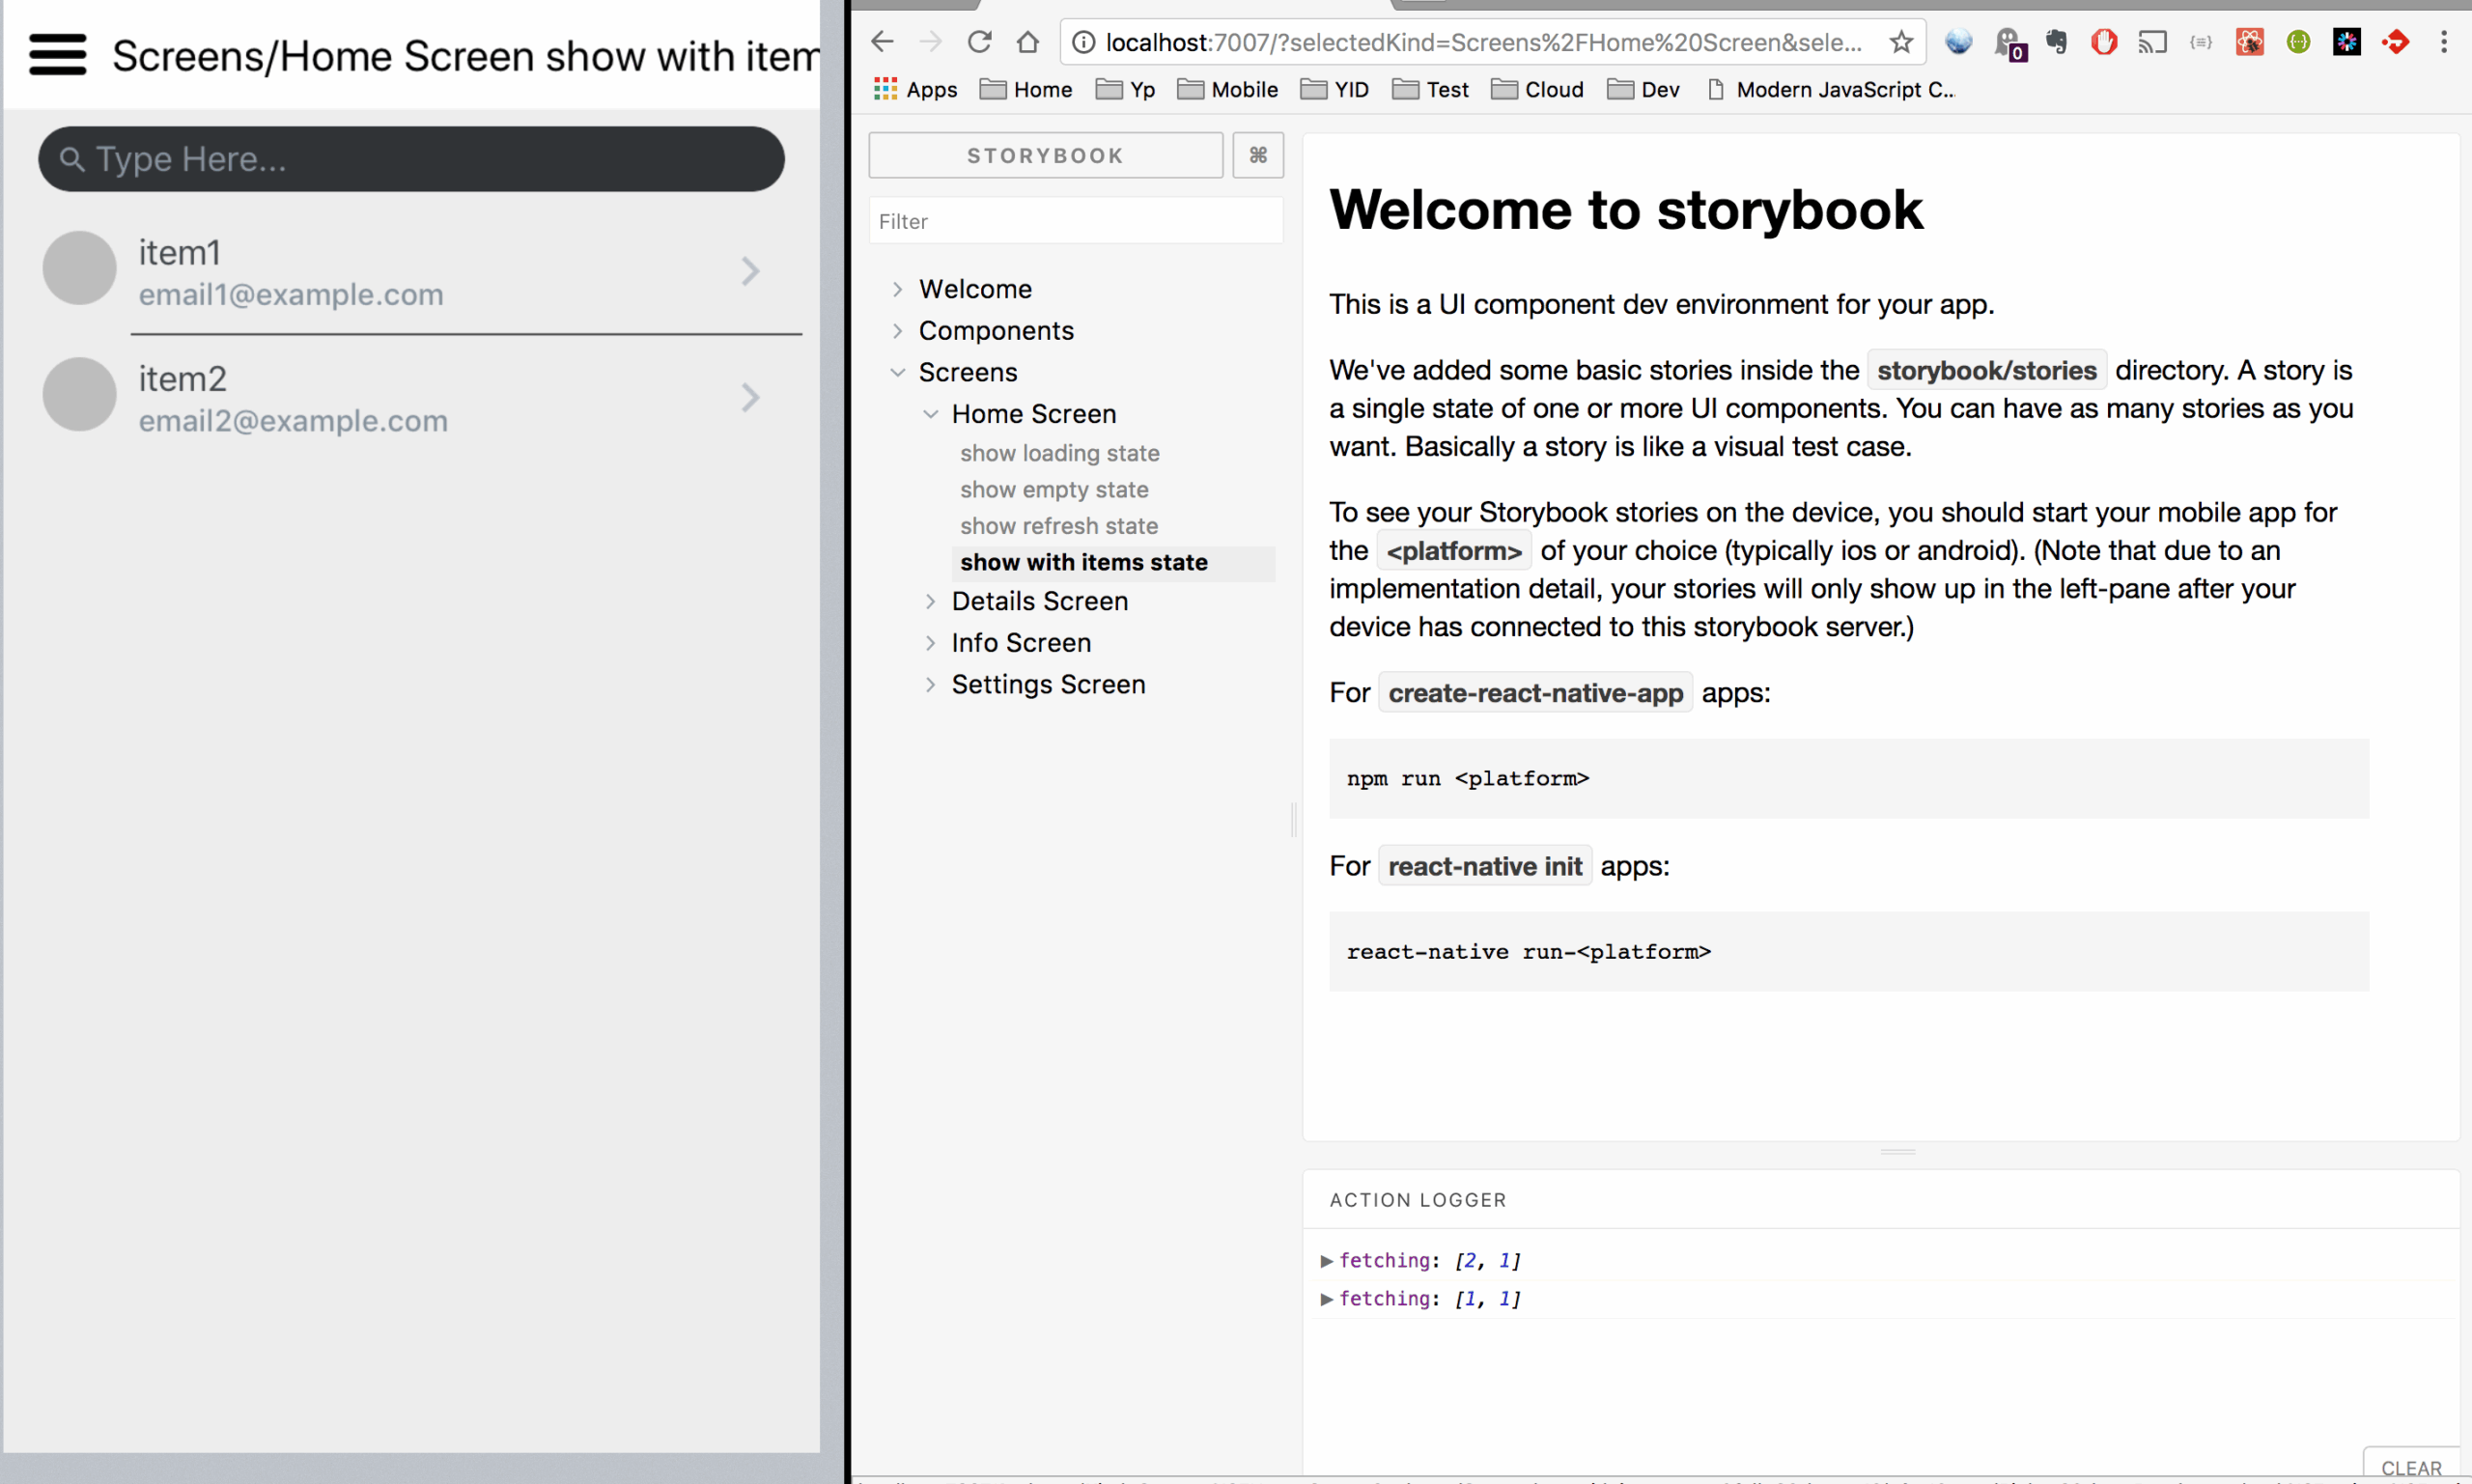
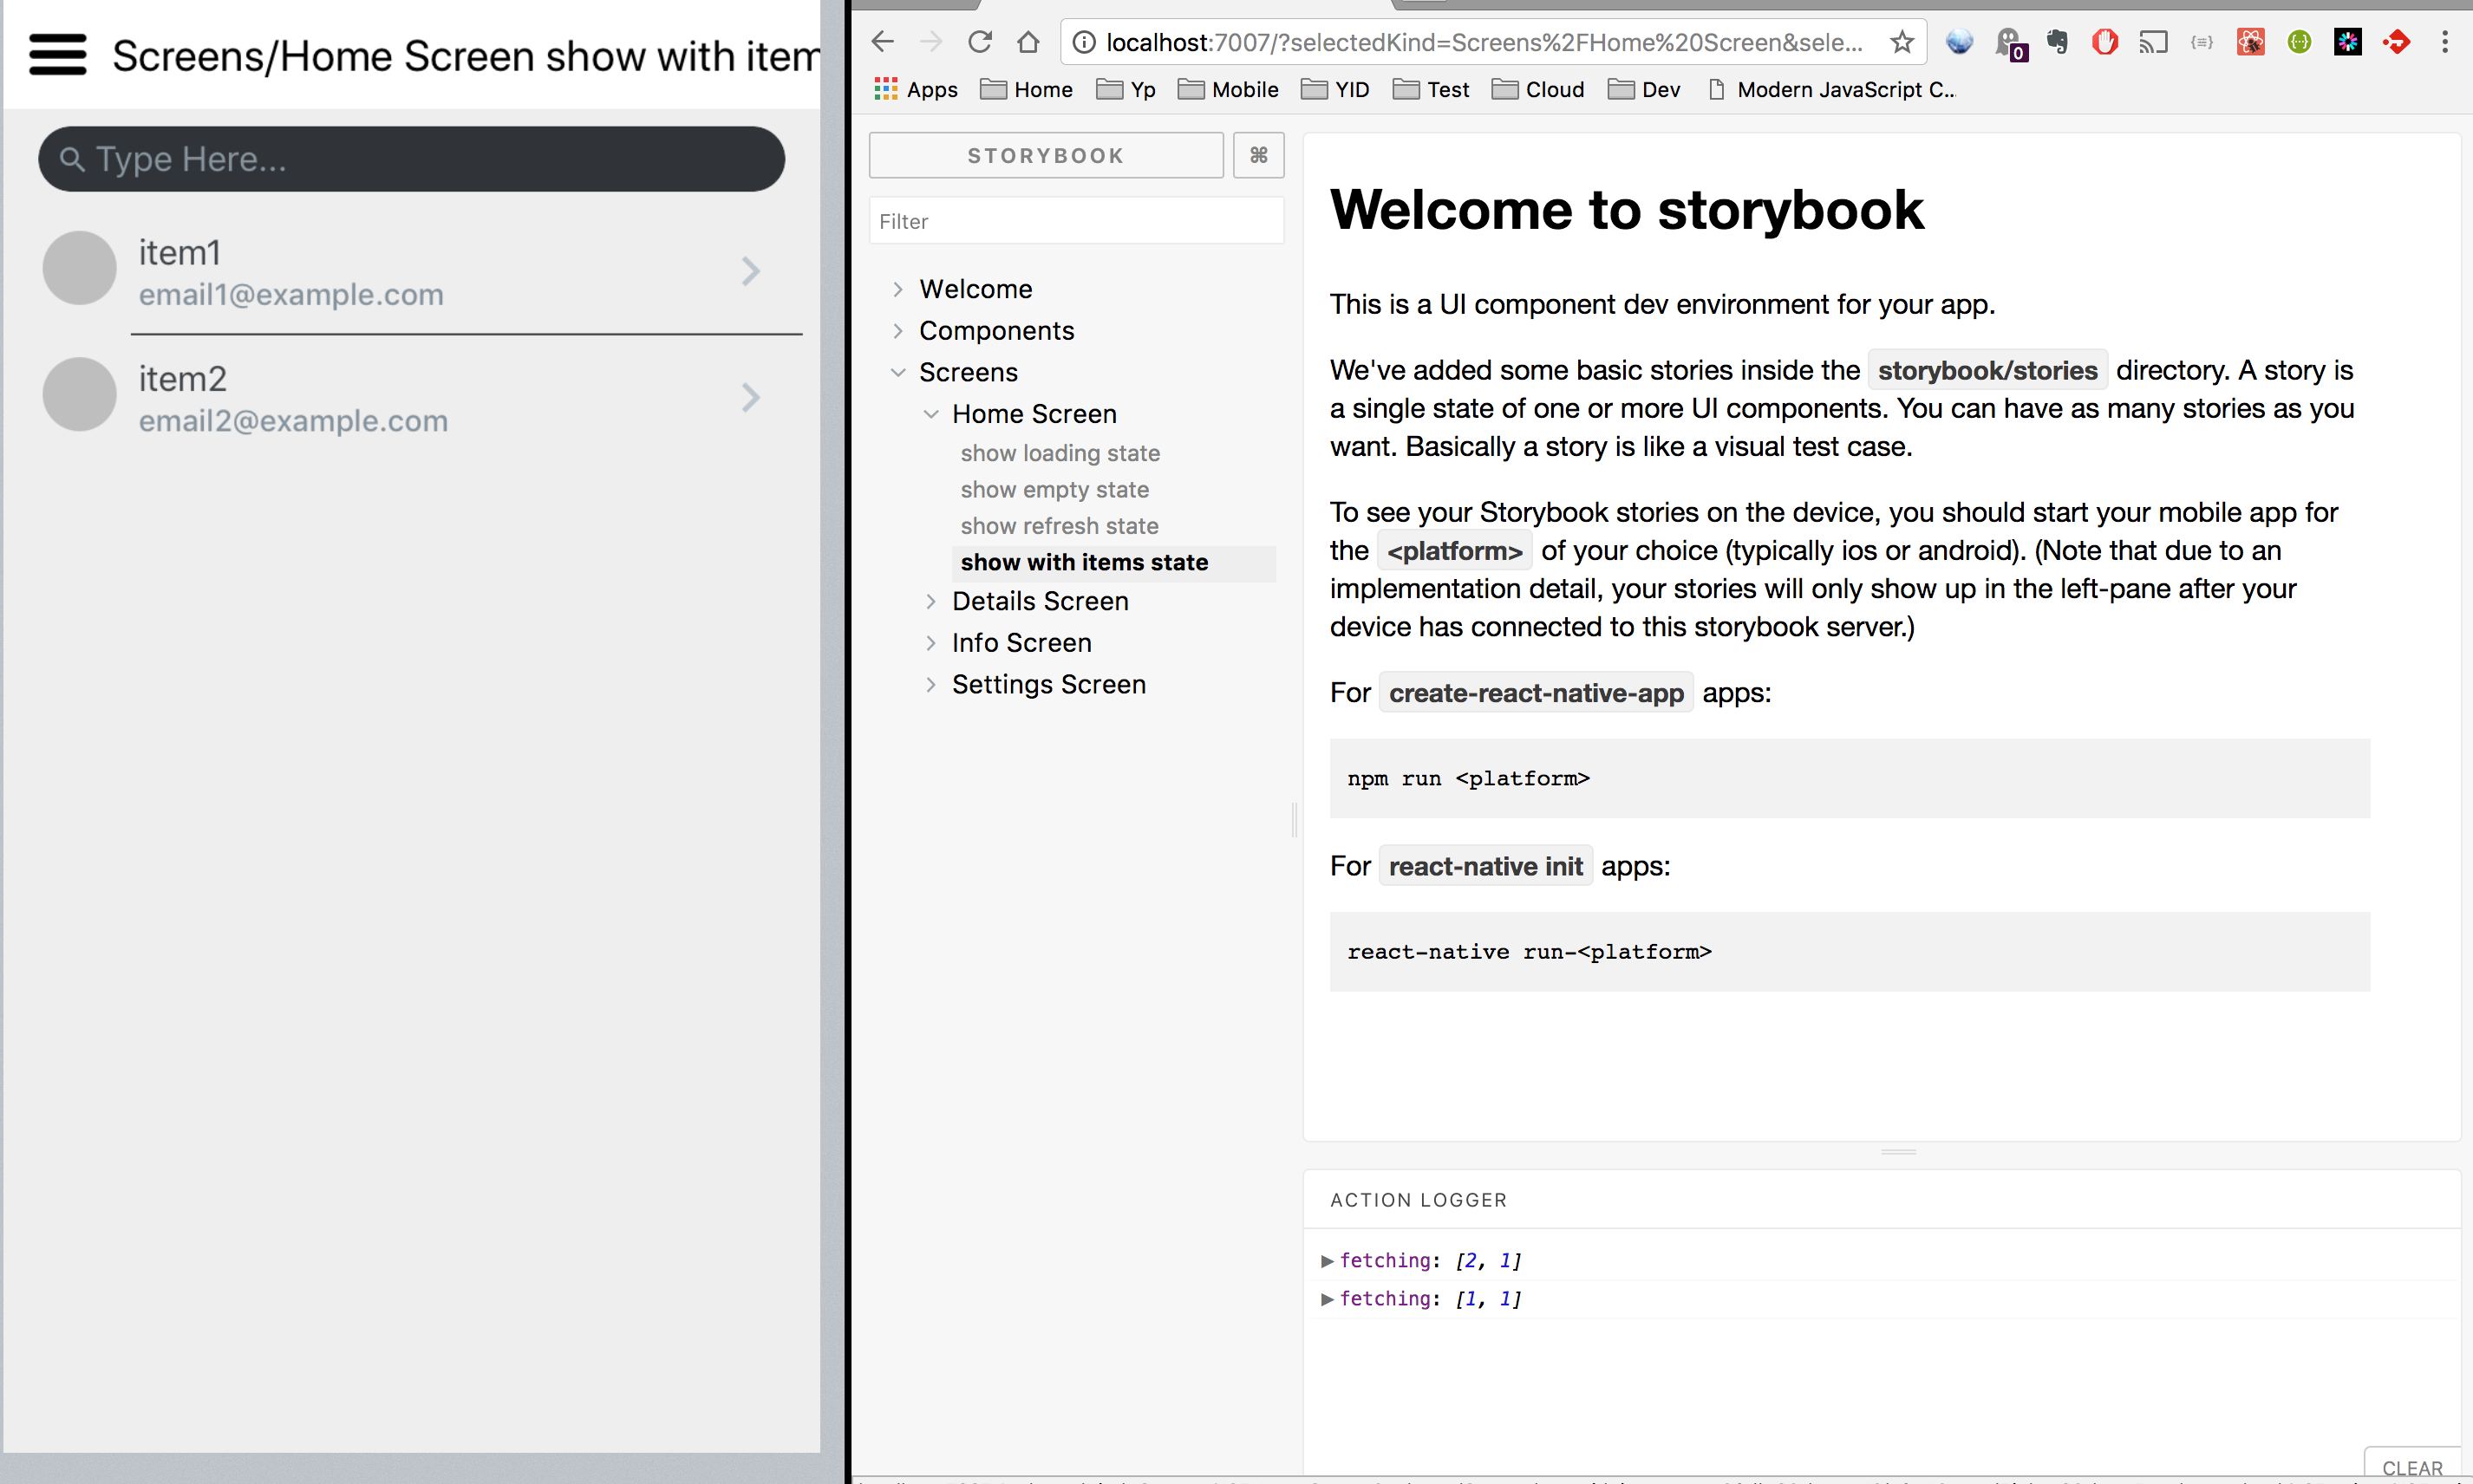
    Storybook

    Storybook

    Quick start

    git clone https://github.com/syl20lego/rn-skeleton.git
    cd rn-skeleton/
    npm install
    npm start or npm run storybook
    react-native run-ios
    react-native run-android

    Step by step installation guide

    I’ll try to show all the commands you need to run to create your own project in case you don’t want to clone this project.

    Building Projects with Native Code

    Command line tools

    npm install -g create-react-native-app
    npm install -g react-native-cli
    npm install -g react-native-git-upgrade

    Init

    Create your own project.

    react-native init RNskeleton
    git init
    git add .
    git commit -m "initial"
    npm install

    Dependencies

    React Component

    npm install --save prop-types
    yarn add prop-types

    Redux,Persist,Saga

    npm install --save react-redux redux redux-logger
    npm install --save redux-persist
    npm install --save redux-saga
    yarn add react-redux redux redux-logger
    yarn add redux-persist
    yarn add redux-saga

    Navigation

    npm install --save react-navigation
    npm install --save react-navigation-redux-helpers
    yarn add react-navigation
    yarn add react-navigation-redux-helpers

    Icons and Native Elements

    npm install --save react-native-elements
    npm install --save react-native-vector-icons
    react-native link
    yarn add react-native-elements
    yarn add react-native-vector-icons
    react-native link

    Fonts

    react-native link

    Testing

    npm install --save-dev jest babel-jest babel-preset-es2015 babel-preset-react react-test-renderer
    npm install --save-dev jest-cli
    npm install --save-dev nock
    npm install --save-dev enzyme
    npm install --save-dev enzyme-adapter-react-16
    npm install --save-dev react-dom
    yarn add --dev jest babel-jest babel-preset-es2015 babel-preset-react react-test-renderer
    yarn add --dev jest-cli
    yarn add --dev nock
    yarn add --dev enzyme
    yarn add --dev enzyme-adapter-react-16
    yarn add --dev react-dom

    StoryBook

    npm -g i @storybook/cli
    yarn global add @storybook/cli
    getstorybook
    npm install

    Running Jest

    npm install -g jest
    jest --watch

    Running StoryBook

    yarn run storybook 

    or

    npm run storybook

    Runing Simulators

    iOS

    react-native run-ios

    Android

    react-native run-android

    Show RN options

    adb shell input keyevent 82

    Reload RN

    adb shell input text "RR"

    Architecture

    From the application creation there are few choice you will have to make, I’ll try to explains my decisions but sometime I’ll just use the defacto.

    Expo or Native Code

    Right from the start you have to make one big decision, either you use Expo or go Native Code way. The key to architecture is sometime it is better to delay the decision until it is important. Commiting to Expo right now seems to be a big steps and I wanted to decide which components to include along the way. I also wanted to be able to use my own native component in the future, I could always eject with Expo but would be leave with a big dependency. Since this is a learning journey, I decided to go the native code way.

    Tutorial

    React Native doesn’t allow you to have anything other then alphanum chararcters in your project name, I named my repo rn-skeleton so I opt for RNskeleton and changed the directory name when creating the project Init.

    Finaly this is the first version of react native 0.50 (0.54 now) that doesn’t generate the index.android.js and index.ios.js. We can start editing the App.js directly. I want my files to be under /src rather then /app since there is alreay an app.json and an App.js.

    Redux, Persist, Saga and the redux store

    In our application the store and the persistor are coming from our store component, it is pretty much same as PersistGate example usage

    Application is our own application component.

    App.js

    render() {
            const {persistor, store} = Store;
            const onBeforeLift = () => {
                // take some action before the gate lifts
            };
            // persistor.purge();
            return (
                <Provider store={store}>
                    <PersistGate
                        loading={<ActivityIndicator/>}
                        onBeforeLift={onBeforeLift}
                        persistor={persistor}>
                        <Application/>
                    </PersistGate>
                </Provider>
            );
        }

    We setup the store

    store/index.js

    const config = {
        key: 'root',
        storage,
    };
    const enhancers =
        [applyMiddleware(
            loggerMiddleware,
            sagaMiddleware
        )];
    const persistConfig = {enhancers};
    const store = createStore(persistCombineReducers(config, reducer), initialState, compose(...enhancers));
    const persistor = persistStore(store, persistConfig);
    sagaMiddleware.run(saga);
    return {persistor, store};

    In our reducers, we export the root reducer, but we keep each implementation inside their own reducer.

    reducers/index.js

    import navigator from './navigation.reducer';
    import users from './users.reducer';
    
    const rootReducer = {
        navigator,
        users
    };
    
    export default rootReducer;

    Similar in our sagas we iterate and fork each implementation. Thanks to Jamie Sunderland proposal

    sagas/index.js

    import {fork} from 'redux-saga/effects';
    import users from './users.saga';
    
    const sagas = [
        ...users
    ];
    
    export default function* root() {
        yield sagas.map(saga => fork(saga));
    }

    Each saga can export a list of saga generators

    sagas/user.saga.js

    function* fetchUsersSaga() {
        yield takeEvery(FETCH_USERS, fetchUsersEffect)
    }
    
    
    export default [fetchUsersSaga];

    We javascript destructing for all actions in a common action creator

    actions/index.js

    import * as Users from './users.action';
    
    export const ActionCreators = {
        ...Users
    };

    Since we are using saga, our action creator can be simple objects.

    actions/users.action.js

    export const fetchUsers = (page, seed) => {
        return {
            type: FETCH_USERS,
            data: {
                page,
                seed
            }
        };
    };

    React navigation and redux

    Our application is returning our root stack navigator, this is similar to React Navigation with Redux Integration

    src/index.js

        render() {
            const { dispatch, navigator } = this.props;
            return (
                <Navigator
                    navigation={
                        addNavigationHelpers({
                            dispatch,
                            state: navigator
                        })
                    }
                />
            )
        }
    }
    
    const mapStateToProps = state => ({
        navigator: state.navigator,
    });
    
    export default Application = connect(mapStateToProps)(AppWithNavigation);

    Navigation reducer

    reducer/navigation.reducer.js

    import { NavigationActions } from 'react-navigation';
    
    import Navigator  from '../routes';
    
    const initialState = Navigator.router.getStateForAction(NavigationActions.init);
    
    export default (state = initialState, action) => {
        const nextState = Navigator.router.getStateForAction(action, state);
        return nextState || state;
    };

    Our application is using Tab navigation, therefore our Root navigator setup the tabs. We need headerMode to ensure we don’t show another navigation bar.

    routes/index.js

    export default Navigator = StackNavigator(
        {
            Tabs: {
                screen: Tabs
            }
    
        }, {headerMode: 'none'}
    );

    We setup 2 tabs

    routes/index.js

    const Tabs = TabNavigator(
        {
            HomeTab: {
                screen: HomeStack,
    
            },
            InfoTab: {
                screen: InfoStack,
    
            }
        }, {
    
        }
    );

    To keep things clean, each tabs in contained in a separated file.

    routes/home.route.js

    export default HomeRoute = {
        Home: {
            screen: HomeScreen,
            navigationOptions: ({navigation}) => ({
                ...tabs.item,
                title: 'Home',
                header: (Platform.OS === 'android') ? null : navigation.header,
            })
        },
        Details: {
            screen: DetailsScreen,
            navigationOptions: ({navigation}) => ({
                ...tabs.item,
                title: 'Details'
            })
        }
    };

    We can use destructing to reassemble the navigation stack.

    routes/index.js

    export const HomeStack = StackNavigator({
        ...HomeRoute
    });

    Styles

    I like the idea of centralized styles for common component as well as colors scheme and fonts. I was inspired by react-native-weather

    I’ still not sure what should be common, I find having flex instructions and margin a bit cumbersome and they are probably better with the component.

    Storybook

    Storybook is a nice framework to visualize your component without having to run the full application. This is useful for deep component inside your application that requires many steps to get to it. Therefore, it useful while developing your component and also it has the advantage to promote decouple components and provide an easy way to test.

    We don’t need android and iOS index anymore since React Native 0.50.

    rm storybook/index.android.js 
    rm storybook/index.ios.js 

    Replace the index.js (under storybook) by the content of storybook.js (no need of the indirection)

    rm storybook/index.js 
    mv storybook/storybook.js storybook/index.js

    Move the stories undes the test folder.

    mv storybook/stories test/

    You can access the storybook via the browser http://localhost:7007/

    By default storybook and stories are created under the same folder storybook, after cleaning up the old ios and android index files, I moved the stories under /test. This makes it easier to have all non production code under the same folder.

    I like to keep thing organized separately so you have one stories file per components.

    Testing

    My preference is to have all test under the same directory structure (aka /test), this allow you to have the test separated by their categories: unit, integration. Since integration tests might require more time/setup. I also consider storybooks as non production code and kept it under the /test folder.

    Unit testing

    You need to configure JEST, setup file, ignore files

    package.json

     "jest": {
        "preset": "react-native",
        "setupFiles": [
          "./__tests__/setup"
        ],
        "testPathIgnorePatterns": [
          "/node_modules/",
          "./__tests__/setup"
        ],
        "transformIgnorePatterns": [
          "node_modules/(?!react-native|react-navigation)/"
        ],
        "coverageReporters": [
          "html",
          "text"
        ]
      }
    

    __tests__/setup.js

    In the setup, I use the following configuration

    global.XMLHttpRequest = require("isomorphic-fetch");
    import Enzyme from 'enzyme'
    import Adapter from 'enzyme-adapter-react-16'
    Enzyme.configure({ adapter: new Adapter() });

    Actions are really easy to test, you just need to ensure they provide the correct object.

    /test/unit/actions/users.actions.spec.js

    it('Should create an action to fetch users', () => {
        const page = 3;
        const seed = 'ABC';
        const expectedAction = {
            type: types.FETCH_USERS,
            data: {
                page,
                seed
            }
        };
        expect(ActionCreators.fetchUsers(page, seed)).toEqual(expectedAction)
    });

    You can test javascript function, I like to use Nock for API testing HTTP mocking and expectations library

    /test/unit/api/users.api.spec.js

    it('API works correctly to fetch users', (done) => {
        let seed = 22;
        let page = 1;
        nock('https://randomuser.me', {})
            .get(`/api/?seed=${seed}&page=${page}&results=20`)
            .reply(200, `
        {"results": [{
            "name": {
            "first": "nicholas"
            }
        }]}`);
        fetchUsers({seed, page})
            .then((result) => {
                expect(result.error).toBeNull();
                expect(result.list).toHaveLength(1);
                expect(result.list[0].name.first).toBe('nicholas');
            })
            .then(done)
            .catch(done)
    });

    Because the reducers are simply managing states, they are easy to test and you just need to ensure they are creating the proper state given any actions

    /test/unit/reducers/users.reducers.spec.js

    it('should return the initial state', () => {
        console.log('REDUCERS HERE !!!!', reducers.users);
        expect(reducers.users(undefined, {})).toEqual(
            {
                "error": null,
                "list": [],
                "loading": false,
                "page": 1,
                "refreshing": false,
                "seed": 1
            }
        )
    });

    Todo: React Component unit testing

    Integration test

    App.spec.js is an integration test, I haven’t put much work into it yet, I found testing UX high maintenance.

    Should we have redux integration testing instead ? Testing actions/reducers/sagas would be an option instead of UX testing.

    References

    Expo demonstrating how to build my app Capo Keys from scratch to deployment

    • Thanks to Barry Michael Doyle for this excellent tutorial about developing an application from begining to the end using Expo and Redus. Very good explanations and enjoyable to watch

    Simple React Native application with Redux

    • Thanks to Jon Lebensold that provided me with the basic skeleton for redux. createReducer.js is interesting to simplify the reducer switch case. I haven’t use it yet since it makes the reducers pattern looking different.

    FlatList and random user api

    • Thanks to Spencer Carli to giving the UX idea and api as well as the good explanation how to setup FlatList

    What is the right way to do asynchronous operations in Redux?

    • Provides good overview of different solutions for asynchronous framework working with redux. In the end, I select redux-sagas since I like keeping my actions being plain object and reducers simple and only handling states

    Adding custom Fonts

    Links

    Framework

    React component

    React Native Elements Cross Platform React Native UI Toolkit

    React-redux

    Redux-Persist

    React Navigation with Redux Integration

    Storybook is a development environment for UI components

    Test

    Jest Expect

    Enzyme Shallow

    HTTP mocking and expectations library

    Tutorial

    Learning React Native

    Environment

    macOS High Sierra Version 10.13.3

    npm –version 6.0.0

    node –version v8.6.0

    react-native –version react-native-cli: 2.0.1 react-native: 0.54.4

    Visit original content creator repository https://github.com/syl20lego/rn-skeleton